
 Share
Share
 Print
Print
|
|
|
|
|


The Import  button, via the P/N Sell window is used to quickly import P/N Sell information for various parts and their Conditions.
This import file is also known as the Catalog List Price (CLP). Multiple files can be imported; if an entry for a part/condition already exists, then the newer entry will override the older entry. The Catalog List Price typically focuses on parts in 'New' Condition.
To begin the import, users must first prepare the file. For information regarding how to prepare the import file, refer to Preparing File For Import, via the Import Button of the System Standards Training Manual.
Criteria for the P/N Sell Import file:
Release |
Column Name |
Data Type |
Limitation |
Path |
|
P/N |
Alphanumeric |
35 |
Settings/ Update/ P/N Master/ Sell button, General tab |
|
Condition |
Alphanumeric |
8 |
Settings/ Update/ P/N Master/ Sell button, General tab |
|
Effective Date |
Numeric |
8 |
Settings/ Update/ P/N Master/ Sell button, General tab |
|
Unit Sell Price |
Numeric |
11 |
Settings/ Update/ P/N Master/ Sell button, General tab |
|
Percentage Markup |
Numeric |
5 |
Settings/ Update/ P/N Master/ Sell button, General tab |
|
Unit Sell Currency |
Numeric |
11 |
Settings/ Update/ P/N Master/ Sell button, General tab |
|
Currency |
Alphanumeric |
10 |
Settings/ Update/ P/N Master/ Sell button, General tab |
|
Currency Exchange Rate |
Numeric |
14 |
Settings/ Update/ P/N Master/ Sell button, General tab |
|
Warranty Hours |
Numeric |
5 |
Settings/ Update/ P/N Master/ Sell button, Warranty tab |
|
Warranty Cycles |
Numeric |
5 |
Settings/ Update/ P/N Master/ Sell button, Warranty tab |
|
Warranty Days |
Numeric |
5 |
Settings/ Update/ P/N Master/ Sell button, Warranty tab |
|
Schedule A/C Days |
Numeric |
5 |
Settings/ Update/ P/N Master/ Sell button, Warranty tab |
|
Earliest checkbox |
N/A |
Y/N |
Settings/ Update/ P/N Master/ Sell button, Warranty tab |

Go to Settings/ Update/ P/N Master/ Sell button. From the P/N Sell window, select the Import button.
Complete all of the Import steps.
For information regarding how to Import a file, refer to Importing a File via Import Button of the System Standards Training Manual.
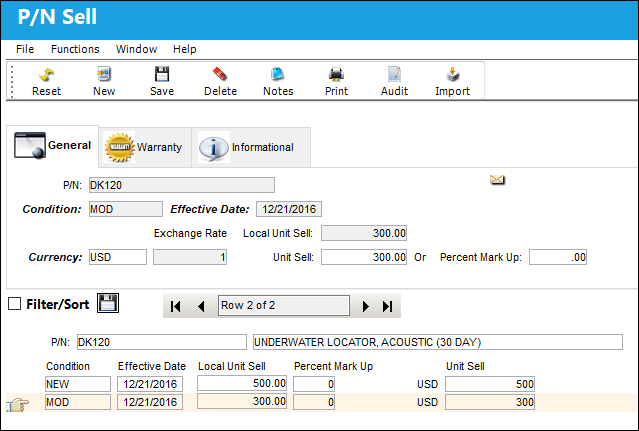
Once the import is complete, the user may go to the P/N Sell window to view the seat configuration information that was imported.
Share
Print
|
©1997-2026 Trax USA Corp. All rights reserved. This manual may not be copied, photocopied, reproduced, translated, or converted to any electronic or machine-readable form, in whole or in part, without prior written approval from Trax USA Corp. |
 |