
 Share
Share
 Print
Print
|
|
|
|
|


Vendor Master, General Tab
TRAX displays the Vendor Master (General Tab) as follows:
When Switch  VNDPRCTCATOF is set to Yes, the Manufacturer, Supplier, Repair, Freight Forwarder, Service, Maintenance, General, and GSE checkboxes will be protected. For additional information, refer to Switch VNDPRCTCATOF via the Settings Switches Manual. The setting of these checkboxes can be defaulted through the Vendor Category Transaction Code. For additional information, refer to the Vendor Category Transaction Code via the Settings Transaction Code Manual.
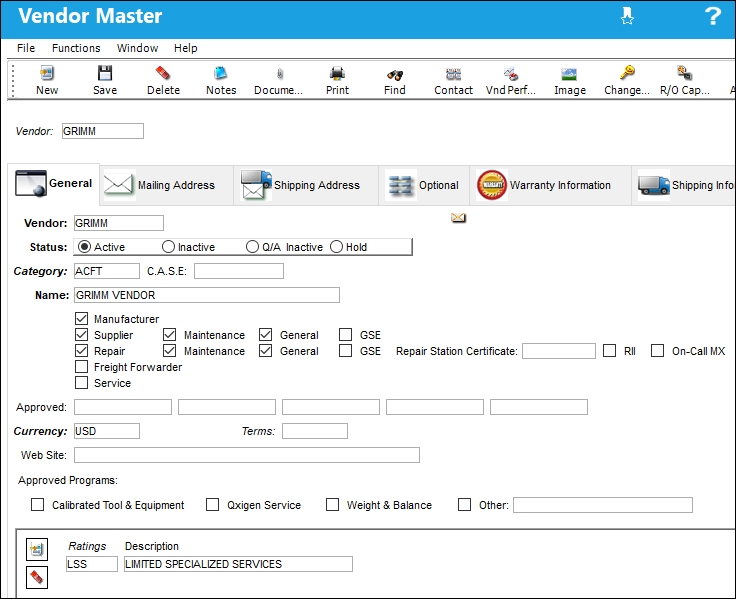
The following information/options are available in this window:
_____________________________________________________________________________________
Vendor
The system code for the service/part provider.
Status
The current status of the selected Vendor. The following options are available:
 Vendor status options are security controlled via Security Explorer/ Settings/ Update/ Vendor Status. For additional information refer to the Security Explorer via the System Administration Training manual.
 Note: Users can set up an email notification system that will alert them of Vendor status changes. This can be done via the System Notification window under the VENDOR STATUS CHANGE option.
Active Status radio button - Active Vendors can be used to provide services (like repairs, maintenance, and part supply) throughout the system.
Inactive Status radio button - This Vendor is no longer active in the system.
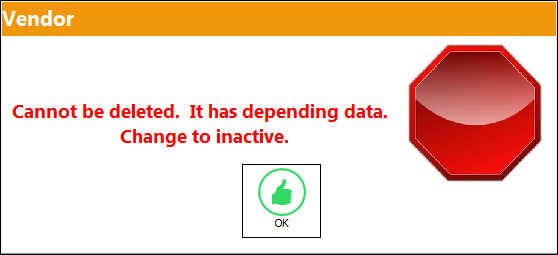
If a Vendor is no longer going to be used in the system, the Vendor record can be deleted from the Vendor Master. But if the Vendor is associated to any components in Inventory or in open orders, then that Vendor cannot be deleted. Because these Vendors have dependencies they can only be placed in Inactive status.
The following warning message appears when a user attempts to delete a Vendor with a dependency:
Q/A Inactive Status radio button - This Vendor is inactive due to a performance related issue. If a Vendor is due for an Audit, and the Audit has not been performed, the status of the Vendor will become 'Q/A Inactive.' Once a Vendor is in Q/A Inactive status, the Vendor cannot be returned to Active status until the performance issue has been complied with. Compliance can be completed via the Audit Requirement Master, Schedule Tab. Once the Vendor audit has been closed, the user must then update the status of the Vendor to Active, via the Audit Requirement Master, Vendor Tab. Once these steps have been completed, the user may then update the status of the Vendor via the Vendor Master, General tab. Please refer to the Quality Assurance manual for additional information regarding auditing Vendors.
Hold Status radio button - This Vendor is on hold pending resolution.
Category
The category of Vendor as defined in the Category Table i.e. Govt, commercial, etc.
C.A.S.E.
Coordinating Agency for Supplier Evaluation.
Name
The official company name of the Vendor.
Manufacturer checkbox
Select this checkbox to indicate that this Vendor is a manufacturer. The vendor can then be specified as a manufacturer via the P/N Master.
This checkbox is security controlled via the Security Explorer/ Settings/ Update/ Vendor Master/ Vendor Capability Checkboxes. For additional information refer to the Security Explorer via the System Administration Training manual.
Supplier checkbox
Select this checkbox to indicate that this Vendor is a supplier.
Maintenance checkbox - Select this checkbox to indicate that this Vendor supplies Maintenance inventory. The system will then allow Purchase Orders to be created with the appropriate inventory type.
General checkbox - Select this checkbox to indicate that this Vendor supplies General inventory. The system will then allow Purchase Orders to be created with the appropriate inventory type.
GSE checkbox - Select this checkbox to indicate that this Vendor supplies GSE inventory. The system will then allow Purchase Orders to be created with the appropriate inventory type.
This checkbox is security controlled via the Security Explorer/ Settings/ Update/ Vendor Master/ Vendor Capability checkboxes. For additional information refer to the Security Explorer via the System Administration Training manual.
Repair checkbox
Select this checkbox to indicate that Repair Orders can be created in association with this vendor.
Maintenance checkbox - Select this checkbox to indicate that this Vendor supplies Maintenance inventory. The system will then allow Repair Orders to be created with the appropriate inventory type.
General checkbox - Select this checkbox to indicate that this Vendor supplies General inventory. The system will then allow Repair Orders to be created with the appropriate inventory type.
GSE checkbox - Select this checkbox to indicate that this Vendor supplies GSE inventory. The system will then allow Repair Orders to be created with the appropriate inventory type.
RII checkbox - Select this checkbox to indicate that this is an RII vendor. Will appear when the Repair checkbox is selected. This is informational only.
On-Call MX checkbox - Select this checkbox to indicate that this is an on-call maintenance vendor. Will appear when the Repair checkbox is selected. This is informational only.
Repair Station Certificate - Enter the Repair Station Certificate number. Will appear when the Repair checkbox is selected. This is informational only.
This checkbox is security controlled via the Security Explorer/ Settings/ Update/ Vendor Master/ Vendor Capability Checkboxes. For additional information refer to the Security Explorer via the System Administration Training manual.
Freight Forwarder checkbox
Select this checkbox to indicate that this Vendor is to be considered a Freight Forwarder. Transactions that involve Vendors who are designated as “Freight Forwarders” can then be performed via the Packing And Shipping, Receiving, and Link modules.
This checkbox is security controlled via the Security Explorer/ Settings/ Update/ Vendor Master/ Vendor Capability Checkboxes. For additional information refer to the Security Explorer via the System Administration Training manual.
Service checkbox
Select this checkbox to indicate that Service Orders can be created with this vendor.
This checkbox is security controlled via the Security Explorer/ Settings/ Update/ Vendor Master/ Vendor Capability Checkboxes. For additional information refer to the Security Explorer via the System Administration Training manual.
Approved
The Vendor approval references (CAA, FAA etc.).
Currency
The main transacting currency of the Vendor.
Terms
The normal accounting terms for this Vendor.
Web Site
The Vendor website address.
Approved Programs
Users can select one or more Approved Programs for the Vendor which will be displayed on the Approved Vendors List Volume 1 and 2 prints alongside each applicable Vendor's entry.
Note: Only Vendors using a AVL-enabled Category code will appear on the Approved Vendors List Volume 1 and 2 prints. For more information, refer to Vendor Category.
Calibrated Tool and Equipment checkbox - Select to display Calibrated Tool and Equipment as an Approved Program for the applicable Vendor on the Approved Vendors List Volume 1 and 2 prints.
Oxygen Service checkbox - Select to display Oxygen Service as an Approved Program for the applicable Vendor on the Approved Vendors List Volume 1 and 2 prints.
Weight and Balance checkbox - Select to display Weight and Balance as an Approved Program for the applicable Vendor on the Approved Vendors List Volume 1 and 2 prints.
Other checkbox - Select to create a custom Approved Program for the applicable Vendor on the Approved Vendors List Volume 1 and 2 prints. When this checkbox is selected a free text field will appear used to name the custom Approved Program.
Ratings
Users can assign and remove Ratings codes to/from the selected Vendor. Assigned Ratings codes will appear on the Approved Vendors List Volume 1 and 2 prints. Rating codes are created through the Ratings Master window.
Note: Only Vendors using a AVL-enabled Category code will appear on the Approved Vendors List Volume 1 and 2 prints. For more information, refer to Vendor Category.
Description
Description of the Rating.
_____________________________________________________________________________________
The Vendor Master, Owner Master, Customer Master and Employee Master are all part of the same relationship master table, therefore cannot have the same code entered. If the same code is entered the user will receive the following message in the Vendor Master:
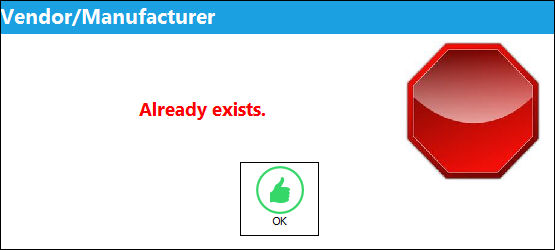
Select OK to acknowledge the message and exit the prompt.
Share
Print
|
©1997-2026 Trax USA Corp. All rights reserved. This manual may not be copied, photocopied, reproduced, translated, or converted to any electronic or machine-readable form, in whole or in part, without prior written approval from Trax USA Corp. |
 |