
 Share
Share
 Print
Print
|
|
|
|
|


W/O Category
The System Transaction Codes are displayed with both the Code Names and Descriptions. The Code Descriptions directly illustrate their functionality and role in the system, as fields are populated and tasks are performed.
Transaction Code: |
W/O CATEGORY |
General Description: |
Categories to be associated with the Work Order. |
Are Authorization Steps Available? |
N |
Is System Notification Available? |
N |
Trax Control Panel Path(s): |
Production/ Update/ W/O/ New Button |
Windows(s): |
w_wo_eu_0 |
Related Switch(s): |
|
Functions: |
Allows for the Categorizing of Work Orders which is helpful for searches. Additional functionality can also applied to W/Os depending on the configurations made through this tran code (see below). |
Reports: |
W/O Print on most print selection may now down the print for a specific W/O Category |
Available Functionality:
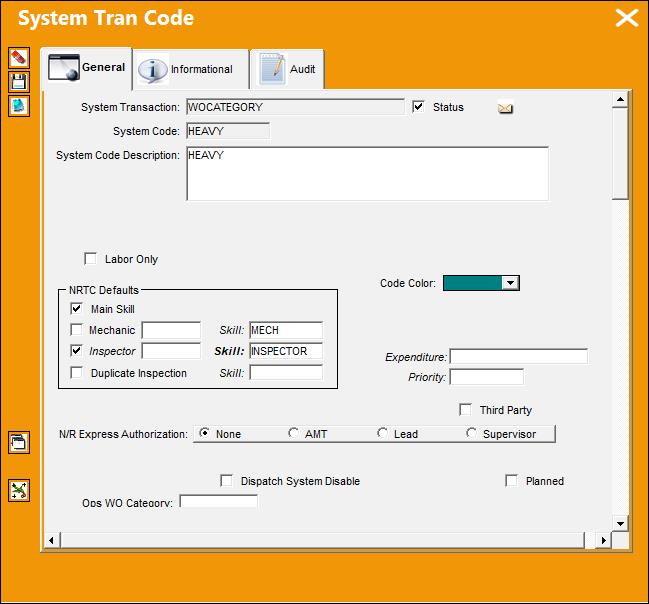
The following information/options are available in this window:
_____________________________________________________________________________________
Labor Only checkbox
When this checkbox is selected, users may not issue materials to a Work Order.
NRTC Defaults
The checkboxes and fields within this section allow the user to auto create the item information for a Non-Routine Task Card for a Work Order that has been created with the specified Transaction Code. For additional information, refer to Switch  AUTOCREATENRTCITEM, via the Production Training Manual.
This field only appears when Switch AUTOCREATENRTCITEM is set to Yes.
Main Skill checkbox
The main skill required to complete the item.
Mechanic checkbox
Select this option to enter any code number related to the mechanic (i.e. skill level). The code field only appears when the checkbox is checked.
Inspector checkbox
Select this option to enter any code number related to the inspector (i.e. skill level). The code field only appears when the checkbox is checked.
Duplicate Inspection checkbox
Select this checkbox if a duplicate inspection is required. This means that two inspectors are required.
Skill
The skill required to complete the item.
Code Color
Select a color code to appear in the Interactive Planner.
No Fly checkbox 
Select this checkbox to designate the transaction as a No Fly W/O Category. For more information regarding No Fly W/Os, refer to the No Fly Button, via Display Control Area.
Note: This checkbox is customer specific and will only be available to certain operators.
No Fly Active Days
Enter the number of days that the transaction was set to No Fly. This field only appears once the No Fly checkbox has been selected and de-selected.
Note: This field is customer specific and will only be available to certain operators.
Expenditure
Select an Expenditure Code to associate to a W/O Category. When creating a new Work Order with a selected W/O Category, the Expenditure Code specified for that W/O Category will auto populate.
Priority
Select a Priority to associate to a W/O Category. When creating a new Work Order with a selected W/O Category, the Priority specified for that W/O Category will auto populate.
Third Party checkbox
Select the Third Party checkbox to associate to a W/O Category. When creating a new Work Order with a selected W/O Category, the Third Party checkbox specified for that W/O Category will be auto selected.
N/R Express Authorization radio buttons
Each radio button determines the authorization process for Non-Routine Task Cards via the N/R Express window. Depending on the selected radio button, users will need to authorize N/R T/Cs from specific authorization windows.
None - No authorization process is required for W/Os with this authorization requirement. Once created, N/R T/Cs go straight into Open status.
AMT - For W/Os with this requirement, the AMT is required to release the N/R T/C for authorization by accepting it via the Accept  button. The AMT can also use the W/O Non-Routine Release for Authorization window to review and accept the N/R T/Cs. After accepting, the N/R T/C goes to Open status. This authorization process is similar to a one step authorization. Only users with the appropriate security access to the N/R Express window buttons and the W/O Non-Routine Release for Authorization window will be allowed to authorize N/R T/C through the 'AMT' setting.
Lead - When selected, a Lead mechanic is required to accept a N/R T/C after its creator releases it for authorization. The Lead then authorizes the N/R T/C by accepting it in the W/O Non-Routine Lead Authorization window. After accepting, the N/R T/C goes to Open status. Only users with the appropriate security access to the N/R Express window buttons and the W/O Non-Routine Lead Authorization window will be allowed to authorize N/R T/C through the W/O Category 'Lead' setting.
Supervisor - When selected, a Supervisor is required to review the N/R T/C then accept or reject it after the Lead mechanic accepts it. After accepting, the N/R T/C goes to Open status. If rejected, the N/R T/C goes back to 'Creator Authorized' status. The Lead mechanic must then update the N/R T/C and accept it again. Only users with the appropriate security access to the N/R Express window buttons and the W/O Non-Routine Supervisor Authorization window will be allowed to authorize N/R T/Cs through the 'Supervisor' setting.
Dispatch System Disable checkbox
This is for Third Party Dispatch systems. Select this checkbox to use this system for this Work Order Category. This checkbox is only used for interface data export.
Ops W/O Category
This field is interface related; it maps the TRAX value for this category in the Ops Interface.
E/C Called On  button
Select the E/C Called On button to associate one or multiple E/Cs to a W/O Category. When creating a new Work Order with a selected W/O Category, the E/Cs specified for that W/O Category will be brought onto the Work Order.
WO Config  button
Select the WO Config button to access the WO Configuration window. This window allows the user to configure the settings for a specified Transaction Code. This transaction code allows the user to link flights records to an aircraft.
_____________________________________________________________________________________
In addition, to help with searches the W/O Category Transaction Code allows for color coding in the Interactive Planning via Planning/Query/A/C Planning Query. The W/O Category code may be entered via Setting/Explorer/System Transaction Codes. Set-up is identical to the creation of any other System Transaction Code with the exception of the additional field for the Code Color.
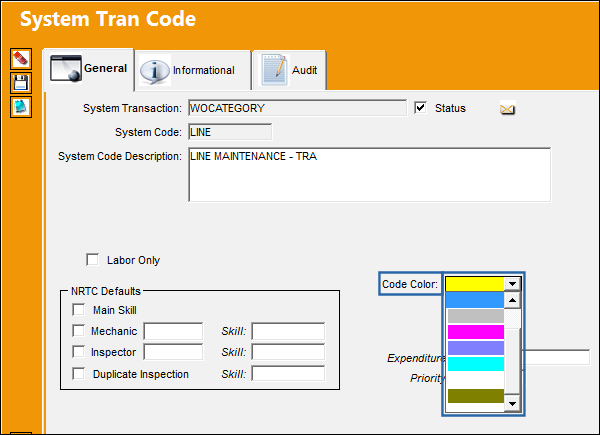
This Code Color will appear in the interactive planner screen once a W/O Category has been attached to the W/O Header via Production/Update/W/O (New  button, category also available in the Shop Module).
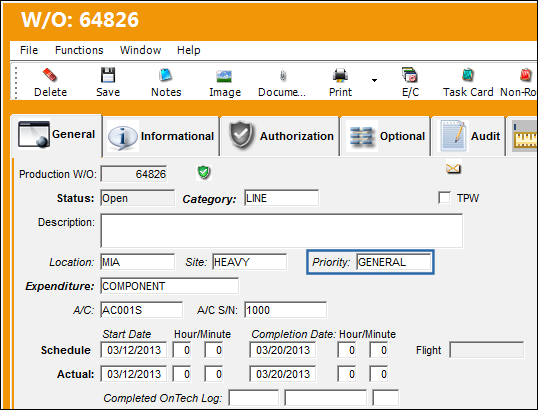
The W/O Header may be accessed from the A/C Planning Query window via Planning/Query/A/C Planning Query.
If the user has selected the color code from the drop selection against the W/O Category that color will appear in the Interactive Planner window, to help the planner quickly identify W/O Categories for up-coming maintenance events.
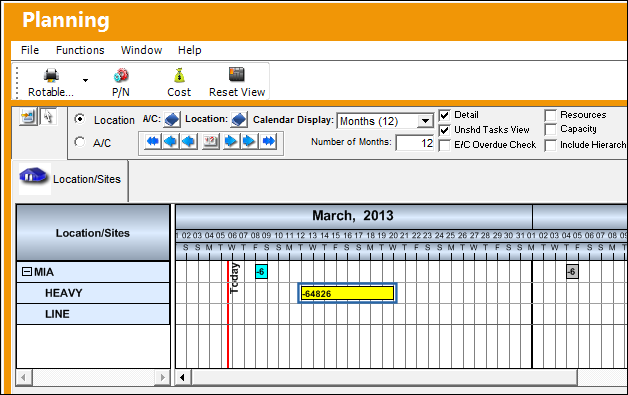
Additional Functionality: E/C Called On Button
From the System Tran Code window for the HEAVY AF Tran Code, select the E/C Called On button.
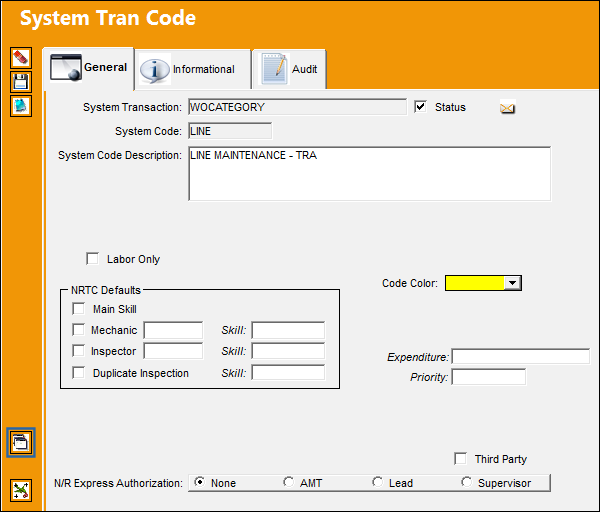
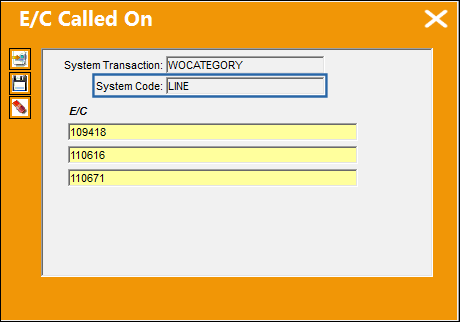
TRAX displays the E/C Called On window. Select the New button to add multiple E/Cs to the System Tran Code and save.
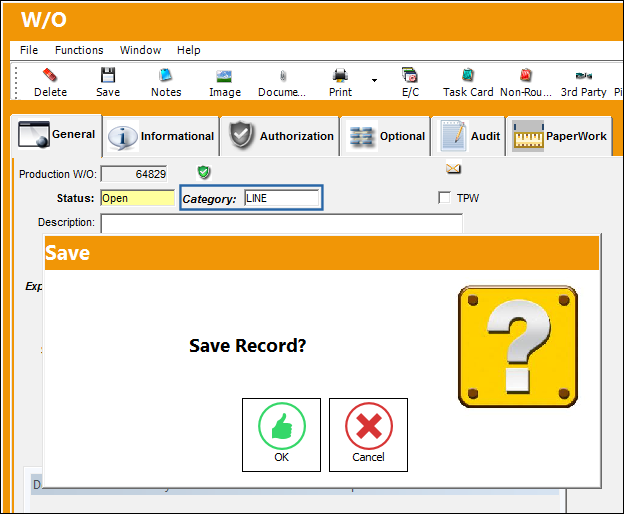
The following Work Order is created with the following W/O Category.
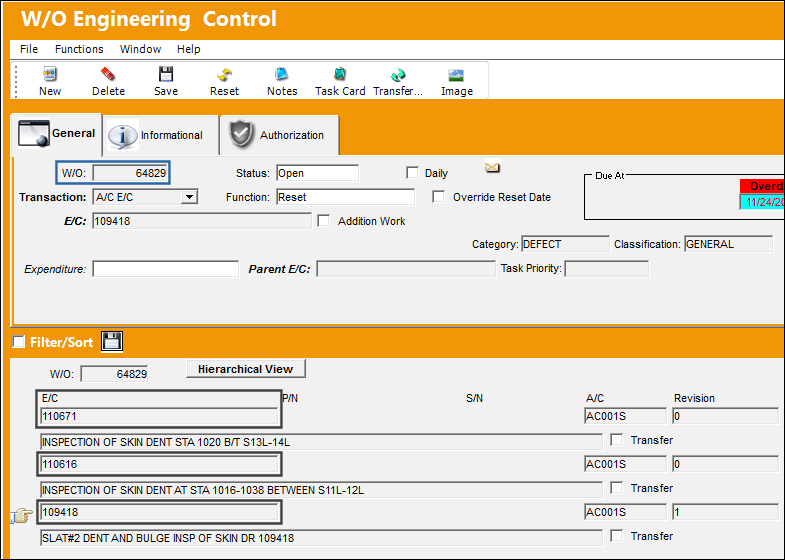
The E/Cs are brought onto the Work Order.
 WO Configuration Button:
The WO Configuration window allows the user to configure the settings for a specified Transaction Code.
The name of this window is determined by the specified Work Order Category selected. In the following example, the PDSC W/O Category is being used, therefore the name the window is PDSC WO Config.
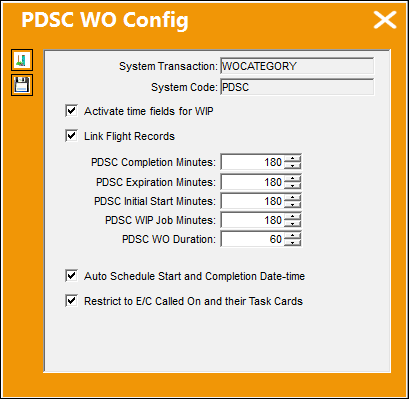
The following information/options are available in this window:
_____________________________________________________________________________________
Activate time fields for WIP checkbox
When this checkbox is selected, the following fields will be activated for the specified W/O Category Transaction Code.
- Completion Minutes
- Expiration Minutes
- Initial Start Minutes
- WIP Job Minutes
- WO Duration
When this checkbox is selected, the Work In Progress Status field in the W/O Header, General tab has additional functionality. When this Status is set to 'WIP', the Status of the W/O automatically goes from 'Generation' to 'Open' once the window is saved. This functionality is only applicable when the W/O Status is Generation. In order for this option to be available, Switch WOSTATGEN must be set to Yes. For more information refer to the Production Switches Manual.
Link Flight Records checkbox
Select this checkbox to link flight records to a Work Order with the specified Work Order Category. If the checkbox is selected, the Flight field in the Work Order Header, General tab will appear italicized and the user will be able to right click into the field and access the drop down menu. If the checkbox is deselected, the Flight field will appear in regular text and the user will be unable to access the drop down menu. The Flight information will have to be entered manually. For additional information on this functionality, refer to the Work Order Header, General tab, via the Production Training Manual.
Completion Minutes
The maximum number of minutes prior to the Published Schedule Start Time of a flight that the associated Work Order can be completed. For example, if the Completion Minutes are set to 60 minutes, and the Scheduled Start Time of the flight is set to depart at 16:00, the Work Order MUST be completed by 15:00.
Expiration Minutes
The number of minutes after the completion of a Work Order (or prior to the scheduled departure of the associated flight) for which the Work Order can be considered valid. For example, if the Expiration Minutes are set to 60 minutes, and the Work Order is completed by 15:00, the scheduled flight must depart at 16:00 in order for the Work Order to be valid.
Initial Start Minutes
The number of minutes prior to the Published Schedule Start Time of a flight that the associated Work Order will be scheduled to start. For example, if the Initial Start Minutes is set to 180 minutes, and the Scheduled Start Time of the flight is 16:00, the Schedule Start Date/Time of the Work Order will be 13:00.
WIP Job Minutes
This field is currently under development.
WO Duration
A time variable set in minutes that will be used in the calculation to set the Schedule Completion Date/Time for the automatically created Work Order. For example, if the Work Order duration is set to 120 minutes, and the Schedule Start Time is 14:00, the Schedule Completed Time will be 16:00.
Auto Schedule Start and Completion Date checkbox
When selected, a W/O with this Category will have its Schedule Start Date set to the current date/time and the Schedule Completion Date will be set to the current date/time plus the WO Duration. For example, if the current time in 8:00 and the WO Duration is 180 minutes, the Completion time will be 11:00.
Restrict to E/C Called On and their Task Cards checkbox
When selected, only Engineering Controls that are listed in the W/O Category's E/C Called On button (above) can be associated to a W/O with this Category. All other E/Cs will be restricted.
_____________________________________________________________________________________
Share
Print
|
©1997-2026 Trax USA Corp. All rights reserved. This manual may not be copied, photocopied, reproduced, translated, or converted to any electronic or machine-readable form, in whole or in part, without prior written approval from Trax USA Corp. |
 |