
 Share
Share
 Print
Print
|
|
|
|
|


The FRMFIM allows the user to import Fault Code Reports/Manuals into the Fault Code Master through the TraxDoc module.
TraxDoc Set Up (FRMFIM)
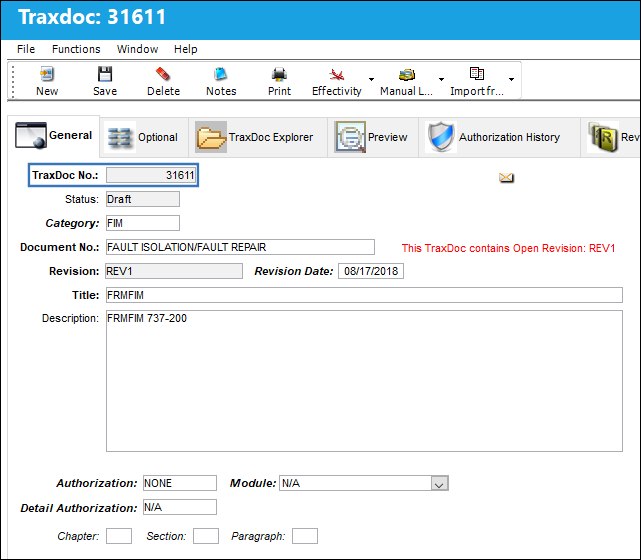
Create a new TraxDoc.
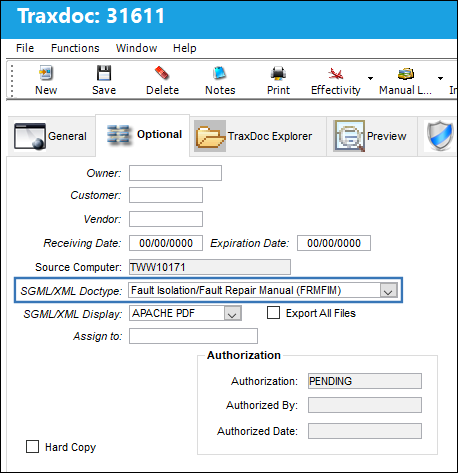
Specify the SGML/XML Doctype in the TraxDoc Document Detail, Optional tab. In this example, select Fault Isolation/Fault Repair Manual (FRMFIM).
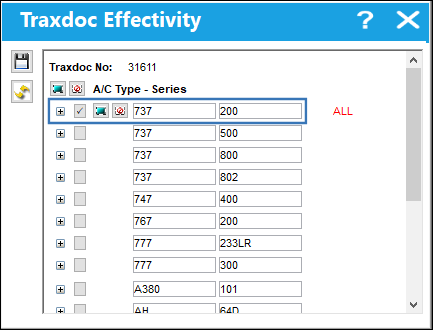
Select the Effectivity  button to apply effectivity to the TraxDoc.
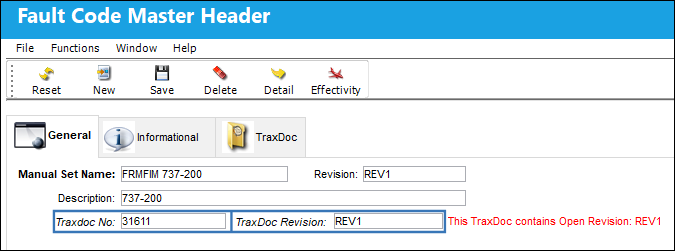
Create a Fault Code Report and reference the TraxDoc created above. Be sure to specify the same revision for the TraxDoc as well.
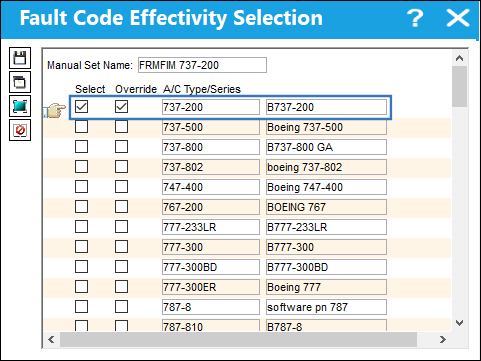
The Fault Code Report must also have the save effectivity as the TraxDoc:
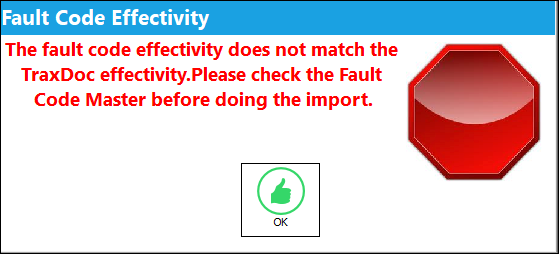
If the effectivity for the Fault Code does not match the effectivity for the TraxDoc, the system will display the following warning:
Importing FRMFIM into the system:
From the TraxDoc Document Detail, General tab, select the Import From OEM  button.
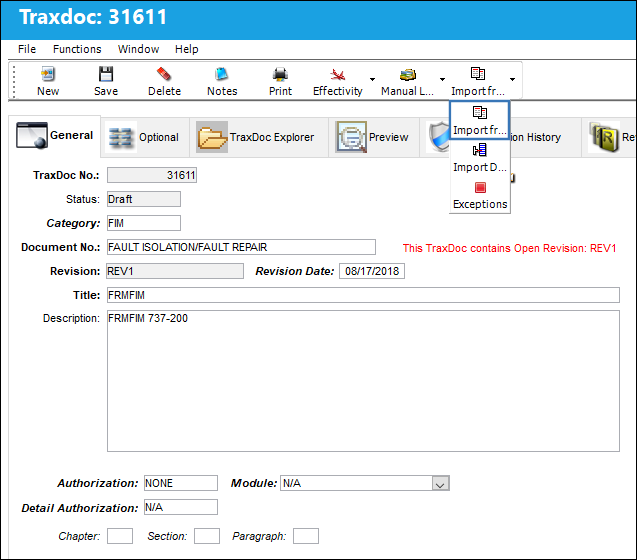
The Task Card Create from FRMFIM window appears. Populate all mandatory and desired information and select the Next  button.
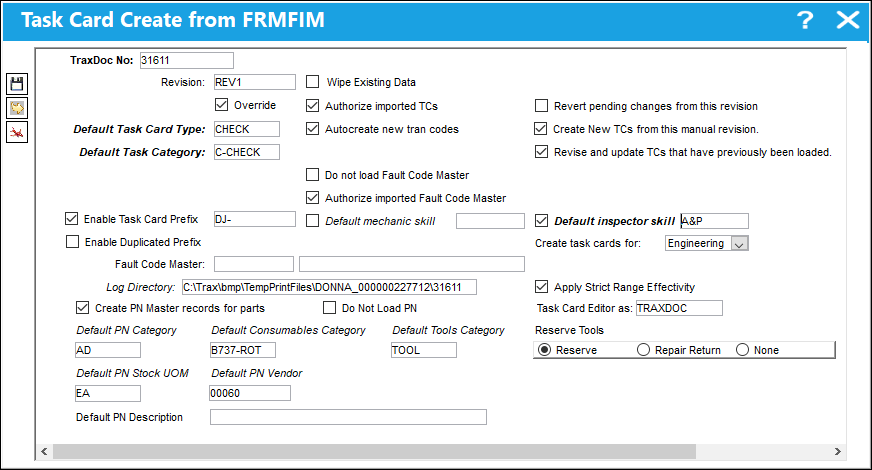
The following information/options are available in this window:
_____________________________________________________________________________________
TraxDoc No.
The TraxDoc Document ID number, which is automatically generated by the system.
Revision
The document’s current revision number. Each TraxDoc can have multiple revisions as the data/records created through the TraxDoc will need to be updated (revised) regularly depending on the requirements of the aircraft manufacturer, regulatory agency, airline, etc.
Override checkbox
Select this checkbox to override the Revision for Task Cards that are being imported.
Default Task Card Type
The Task Card Type. This is useful in the sort and locating of the Task Card.
Default Task Category
Select the Task Card Category to be assigned to all Task Cards being created/revised from this import. Task Card Category will delegate the authorization process and send notifications as defined in the System Transaction Codes.
Company 
The Company used to auto generate the Task Card reference. This field only appears when G/L Interface Switch  COMPANYMULTI is set to Yes. When this field is populated, only those aircraft with the same G/L Company via the A/C Master, Other 1 tab can be made effective to the T/C. The imported T/C will be created for the selected company.
Note: When importing new revisions of existing T/Cs, only the selected company's records will be updated to the new revision.
Note: When the 'ALL' option is selected from the Company drop down field, the imported T/Cs will be created/revised for each company in the system. The records will not be company-specific.
Wipe Existing Data checkbox
Select this checkbox to replace the existing data with the data from the new revision.
 This checkbox is security controlled via TraxDoc/ Update/ TraxDoc Master/ Import From OEM Manual Button.
Authorize imported TCs checkbox
Select this checkbox to automatically authorize all Task Cards created.
Autocreate new tran codes checkbox
Some of the Task Card information provided in OEM manuals is controlled by Tran codes (i.e. Task Card types, areas, and skills). Selecting this checkbox will automatically create a Tran code record for any values found in the manual. If this box is not checked, the fields will still be set in the Task Card, but will have to be changed manually when working with the task card. This option is unchecked by default.
Do not load Fault Code Master checkbox
When this checkbox is selected, the system will not load and Fault Codes into the Fault Code Master, via the Settings module.
Authorize imported Fault Code Master checkbox
Select this checkbox to automatically authorize all Fault Codes being imported into the Fault Code Master via the Settings module.
Revert pending changes from this revision checkbox
Select this checkbox to revert pending changes to the revision. Any new Task Cards created for this revision will also be deleted.
Create New TCs from this manual revision checkbox
Select this checkbox to create new Task Cards from the current manual revision.
Revise and update TCs that have previously been loaded checkbox
Select this checkbox to revise and update Task Cards that have previously been loaded.
Enable Task Card Prefix checkbox
Select this checkbox to allow a prefix to be assigned to Task Cards being imported.
Task Card Prefix - The prefix to be assigned to the T/C being imported.
Enable Duplicated Prefix checkbox
Select this checkbox to allow a duplicate prefix to be assigned to Task Cards being imported.
Duplicated Prefix - A duplicate of the prefix to be assigned to the T/C being imported.
Default mechanic skill checkbox
Select this checkbox if the mechanic skill is mandatory. The Default mechanic skill field will become mandatory once this checkbox is selected.
Default mechanic skill - The default mechanic skill for the Task Card items created if this is not supplied by the OEM manual.
Default inspector skill checkbox
Select this checkbox if the inspector skill is mandatory. The Default inspector skill field will become mandatory once this checkbox is selected.
Default inspector skill - The default inspector skill for the Task Card items created if this is not supplied by the OEM manual.
Create task cards for drop down
Select the module required to load the SGML Task Card to: Engineering, Shop, GSE.
Fault Code Master
The Fault Code associated to the TraxDoc. When this field is populated, it indicates that the Fault Codes from this revision will be created for the specified Fault Code in the Settings module.
Log Directory
This option allows the user to specify the directory to which log files and error reports will be saved. The initial value is a sub-folder inside the default temporary directory.
Apply Strict Range Effectivity checkbox
When checked, imported Task Cards/Engineering Controls will be made effective to all Aircraft Type/Series, regardless of whether or not tail-level effectivity is specified in the manual. Positions, Zones, Panels, References, etc. will also be created for all type/series. If unchecked, effectivity will only be created for those type/series that have a least one effective Aircraft specified in the manual.
Task Card Editor As drop down menu 
Select the editor type to create the format of the Task Card. The user may select from the following options:
- TRAXDOC
- TASKCARD
When the TASKCARD Editor is selected, the items of the Task Card will be generated in RTF.
Create PN Master records for parts
Select this checkbox to auto create records in the P/N Master for any parts found in the manual. When this checkbox is selected, the following fields appear:
Default PN Category - This P/N Category field in this window is referring to only Expendable and Consumable part numbers. This determines how the system will handle this part. If the Category entered is Expendable or Consumable, the system will be expecting either an Expendable or Consumable number for every item in the system for this part number.
Default Consumable Category - This P/N Category field in this window is referring to only Expendable and Consumable part numbers. This determines how the system will handle this part. If the Category is a 'non-serialized' or a 'kit' type then the system will not be expecting serial numbers for every item.
The user must enter default values to place in these fields in case the AMM does not contain data for them.
Default Tools Category - This P/N Category field in this window is referring to Tool part numbers. This determines how the system will handle this part. A Tool P/N Category can be defined as serialized or non-serialized. If serialized, the system will be expecting serial numbers for every item in the system for this part number. The user must enter default values to place in these fields in case the AMM does not contain data for them. Parts for this category are identified by the TOOLNBR tag.
Default PN Stock UOM - The ATA code for Unit Of Measurement (or internal code if preferred). The Order UOM differentiates by Stock UOM a unit of conversion may be defined in the UOM code which will automatically convert the Order UOM to the Stock UOM at receiving.
The user must enter default values to place in these fields in case the AMM does not contain data for them.
Default PN Vendor - The Manufacturer or main Vendor for this part. The Vendor must be flagged in the Vendor Master as a Manufacturer to populate this field.
The user must enter default values to place in these fields in case the AMM does not contain data for them.
Default PN Description - The description of the part number.
The user must enter default values to place in these fields in case the AMM does not contain data for them.
Do Not Load PN checkbox
When this checkbox is selected, the system will not load the P/Ns against the Task Card(s) created with the import.
Reserve Tools
Select from one of the following radio buttons:
Reserve radio button - Select this button to reserve the tool when W/O P/N reservation is applied.
Repair Return radio button - Select this button to repair/return the tool when W/O P/N reservation is applied.
None radio button - Select this button if no tool has been reserved or repaired.
These options only apply to tools, not spares.
_____________________________________________________________________________________
Share
Print
|
©1997-2026 Trax USA Corp. All rights reserved. This manual may not be copied, photocopied, reproduced, translated, or converted to any electronic or machine-readable form, in whole or in part, without prior written approval from Trax USA Corp. |
 |