
 Share
Share
 Print
Print
|
|
|
|
|


Work Group & Group Member Listing, via Man Hours Planner
The Work Group and Group Member Listing section of the Man Hour Schedule Planner lists all of the Work Groups and their members as defined in the Man Hour Schedule via Planning/Update.
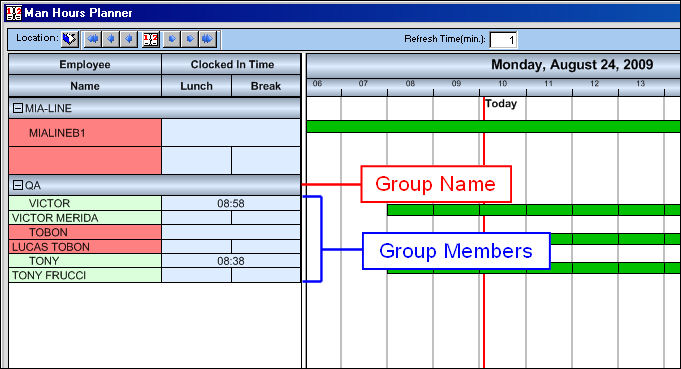
The Work Group and Group Members are broken down as follows.
The following information/options are available in this window:
_____________________________________________________________________________________
Work Group Name
The Work Group Name that is defined in the Man Hour Schedule. By selecting on the Plus Sign  button the group will expand to reveal the group employees (members). Select the Minus Sign
  button to collapse the employee listing.
Employee
The employee's username or ID number.
Only Employees with an Active Status in the Employee Master can appear in this window. Inactive Employees will not appear. For more information refer to the Employee Master, General Tab via the Settings Training Manual.
Name
The employee's name as listed in the Employee master.
Clocked In Time
The time the employee clocked in via Production/Update/Employee Sign-In/Sign Off.
 - The group member will appear in green when they are signed on.
 - The group member will appear in red when they are signed off.
Lunch
The user's lunch time.
Break
The user's break time.
_____________________________________________________________________________________
The Work Groups and Group Members are created and edited via the Man Hours Schedule window via Planning/Update.
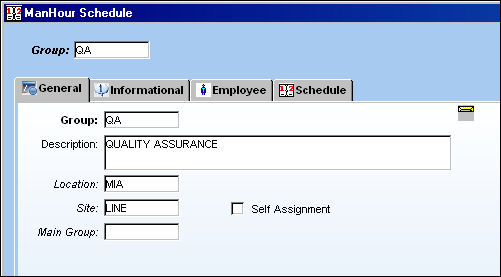
From the Man Hour Schedule, General tab, the Group name is entered along with the Location and site.
The group users are entered through the Employee tab.
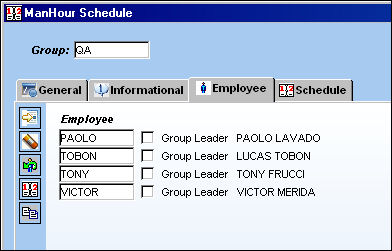
After completing this, schedules can be created through the Schedule  button found in the Employee tab. For more information refer to the Schedule Button, General Tab. Users must then generate the work schedule through the Man Hours Schedule Generation. For more information refer to that window.
Once the group has been generated, users can look up the location and site for that specific group in the Man Hour Schedule Planner window. To do so, select the Location  button at the top left of the window then choose the required locations/sites. Users can also utilize the Select All
  or De-Select All
  buttons. When all selections have been made, click on the Select
  button to view the results.
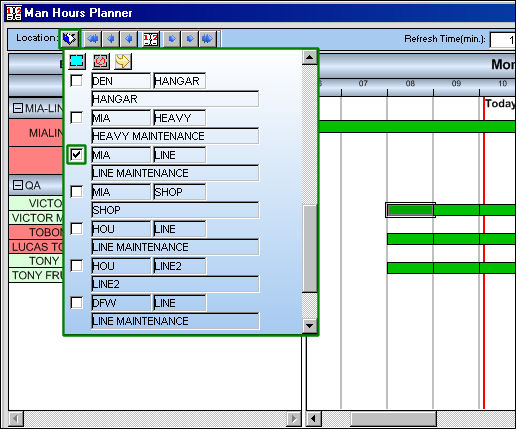
When the Man Hour Schedule Planner window is opened, the displayed Locations/Sites are controlled by Planning Switch  MANPLNDLF:
When set to Yes, the user's Location and Site from the Employee Master is displayed in the Man Hour Schedule Planner by default. If the user is not registered to a Site, all of the Sites within the user's Location will appear by default. If the user is not registered with a Location or a Site, all Locations and Sites will appear by default.
When set to No, all Locations and Sites are displayed by default in the Man Hour Schedule Planner.
For more information refer to Switch MANPLNDLF via the Planning Switches Manual.
After selecting the Locations/Sites, all of the Groups that have been created for the selected locations/sites appear with the employee's work schedule listed to the right (Work Schedule Calendar) and their employee information to the bottom of the screen (Employee Information).
Share
Print
|
©1997-2026 Trax USA Corp. All rights reserved. This manual may not be copied, photocopied, reproduced, translated, or converted to any electronic or machine-readable form, in whole or in part, without prior written approval from Trax USA Corp. |
 |