
 Share
Share
 Print
Print
|
|
|
|
|


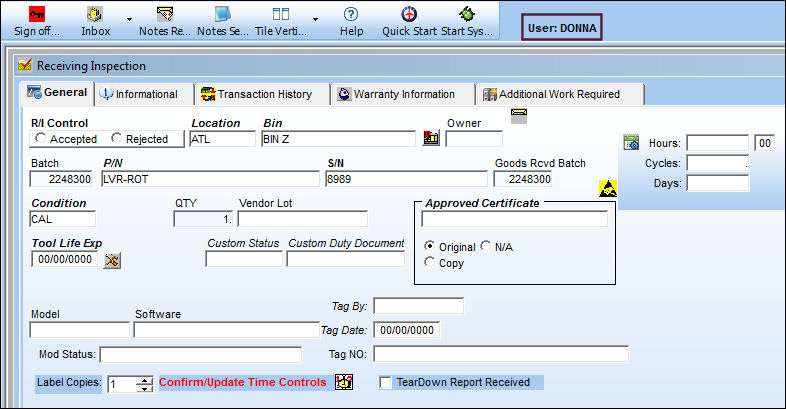
The Receiving Inspection General Tab is used to update the Receiving Inspection Transaction in the system.
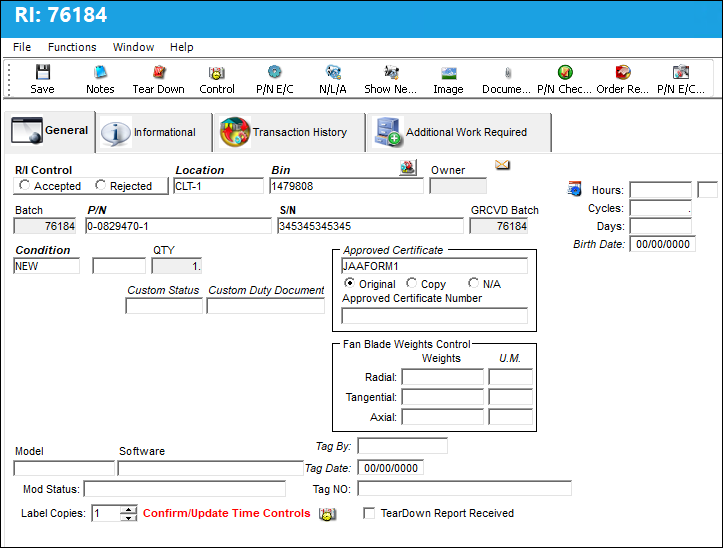
Many fields in this window are informational.
The following information/options are available in this window:
_____________________________________________________________________________________
R/I Control
Receiving Inspection Control. The user must select either the Accepted or Rejected radio button during this process. If the item is accepted, the user can click on the Save  button. If the item is rejected, it must be placed in a quarantine location/bin and given a U/S (Unserviceable) code.
Location
The Location for maintenance events, inventory stores, orders, transactions, or training events.
Bin
The specific storage bin within the inventory location.
Owner
The name of the owner of the part, when applicable.
Batch
The inventory number that is currently associated with a part or group of parts. A part's Batch number can change after various types of transactions take place.
P/N
The Part Number reference for the aircraft part. This may be changed to another part number, if required. A warning will be issued if this happens.
 This field can be disabled (grayed out) through the Security Explorer via Receiving/ Update/ Receiving Inspection/ Receiving Inspection Disable P/N Field. For more information refer to the Security Explorer via the System Administration Training Manual.
 This field, along with others in the window, can be disabled (grayed out) through the Security Explorer via Receiving/ Update/ Receiving Inspection/ Tool Calibration Control with Switch
  TOOLCALCONTROL set to Yes. For more information, refer to the Security Explorer via the System Administration Training Manual.
 Note: There is an audit table in Trax Quick Print called 'pn_sn_change_control_audit' that shows the before and after of the data that is updated via a P/N Change transactions. This information pertains to serialized parts. The data captured includes:
- Previous E/Cs linked to P/N S/N & Actuals
- Previous P/N Controls and Actuals
- New E/Cs being linked
- New P/N Controls being linked
- Transfer of Actuals
S/N
The Serial Number for the specific serialized part.
This field, along with others in the window, can be disabled (grayed out) through the Security Explorer via Receiving/ Update/ Receiving Inspection/ Tool Calibration Control with Switch TOOLCALCONTROL set to Yes. For more information, refer to the Security Explorer via the System Administration Training Manual.
Goods Rcvd Batch
The original inventory number assigned to the part or group of parts when initially introduced/received into inventory. This number will remain the same for a part even if/when the part's Batch number changes.
Condition
The condition of the part.
This field, along with others in the window, can be disabled (grayed out) through the Security Explorer via Receiving/ Update/ Receiving Inspection/ Tool Calibration Control with Switch TOOLCALCONTROL set to Yes. For more information, refer to the Security Explorer via the System Administration Training Manual.
U/S Code
Unserviceable Code that applies to the part, to be stored in a quarantine location.
QTY
The quantity of parts that were received.
Vendor Lot
Vendor batch number of the part entered upon receiving or initial load, as applicable. This field can contain up to 20 characters.
This field, along with others in the window, can be disabled (grayed out) through the Security Explorer via Receiving/ Update/ Receiving Inspection/ Tool Calibration Control with Switch TOOLCALCONTROL set to Yes. For more information, refer to the Security Explorer via the System Administration Training Manual.
Tool Life Expiration
The tool life expiration date of the part, as applicable.
This field, along with others in the window, can be disabled (grayed out) through the Security Explorer via Receiving/ Update/ Receiving Inspection/ Tool Calibration Control with Switch TOOLCALCONTROL set to Yes. For more information, refer to the Security Explorer via the System Administration Training Manual.
Shelf Life Expiration
The shelf life expiration date of the part, as applicable.
Custom Status
Customs status that applies to the part in the transaction, as applicable.
Approved Certificate
The type of certificate approving the part (ie. Form 1, EASA etc.). The user may choose from a pre-defined transaction code, or enter the Approval Certificate manually.
Note the below switch:
- RIAPCRMN - (Approved Certificate (field) Mandatory). If set to Yes, the Approved Certificate field will be mandatory in the Receiving Inspection window. If set to No, the Approved Certificate field will not be mandatory in the Receiving Inspection window.
Original radio button - Select this radio button to indicate that the certificate is an original.
Copy radio button - Select this radio button to indicate that the certificate is a copy.
N/A radio button - Select this radio button to indicate that the certificate is not available.
This field, along with others in the window, can be disabled (grayed out) through the Security Explorer via Receiving/ Update/ Receiving Inspection/ Tool Calibration Control with Switch TOOLCALCONTROL set to Yes. For more information, refer to the Security Explorer via the System Administration Training Manual.
Approved Certificate Number
The Approved Certificate Number. This is a free text field.
Fan Blade Weights Control Field 
Radial - The radial weight, and its accompanying unit of measurement, of the received fan blade.
Tangential - The tangential weight, and its accompanying unit of measurement, of the received fan blade.
Axial - The axial weight, and its accompanying unit of measurement, of the received fan blade.
Note: These fields become mandatory if their respective checkboxes are selected in the P/N Master, Optional Tab. Refer to the P/N Master, Optional Tab for more information.
P/N Master Document Control Link  button
Select this button to view documents linked to the Part Number via the Document Control  button from the P/N Master.
Note: This button is a customized request and may not be available to all customers.
Custom Duty Document
Document used to verify that the part was accepted by customs.
Tool Calibration Number
This is a unique number used to define a tool. This field only appears if the Tool Calibration Number Required checkbox is selected via the P/N Master, Inventory tab, via the P/N Master of the Settings Training Manual.
This field, along with others in the window, can be disabled (grayed out) through the Security Explorer via Receiving/ Update/ Receiving Inspection/ Tool Calibration Control with Switch TOOLCALCONTROL set to Yes. For more information, refer to the Security Explorer via the System Administration Training Manual.
Weight
The weight of the component being received. This information is being pulled from the Optional Tab of the P/N Master.
This field will appear based on the configuration of the "Weight Control at Batch Level" checkbox.
Tag By
Vendor Tag By information.
Tag Date
Date of the Tag.
Tag Number
The tag number associated with the part.
Model
The manufacture modification number. This field is only informational.
Software
The software used by the component being received.
NLA parts with software information entered in this field will behave like software components in the system, particularly as it relates to its relationships with NHAs. Further, the NLA part will contain the software icon indicating it is a software component.
Mod Status
The manufacture modification status. This field is informational only.
This field is mandatory when the Mod Status checkbox is selected in the P/N Master, Technical Engineering Tab via the P/N Master of the Settings Training Manual.
Tear Down Report Received checkbox
If a Tear Down report has been received with the item. If checked, the system will send notification to all users who are set up in the System Notification/Tear Down Notification program.
Label Copies
The number of label copies to be created.
Times Accrual Hours/Cycles/Days
Total time accrued against a serialized part.
Birth Date
The Birth Date of the part. This date is auto populated with the date specified in Purchase Order Receiving, Times Accrual tab. The 'Birth Date' field is used to calculate the Calendar Days of a part number. If the Birthdate field is not populated, the system will default to using the Order Receiving date to calculate the Calendar Days. This field only appears if Switch PNBIRTHDAY is set to Yes. For additional information, refer to Switch PNBIRTHDAY via the Receiving Switches Manual.
Note: When a P/N E/C is planned using the Calendar Days option and Total Days (via the Engineering Control, Schedule Tab), the applicable part's Birth Date is used to track the P/N E/C's due date.
_____________________________________________________________________________________
The system will prompt the user to re-print the tag.
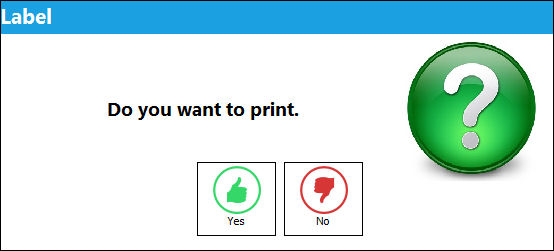
After the receiving inspection transaction is performed and accepted, the item is available for issue to an aircraft.
Once parts have been received and any necessary receiving inspections have been performed, the system can now await entry of the invoice (received from the vendor who sold the parts). Received invoices can be entered via the Link module.
See the Link chapter of this course for additional information regarding entering received invoices into the system.
When accepting a Receiving Inspection for a Repair Order, if any P/N Controls or P/N E/Cs are overdue, the following warning will appear. The message indicates that the part must be sent to repair and will be come unserviceable.
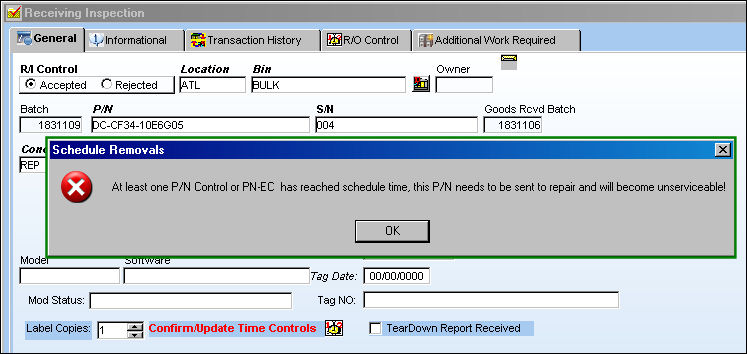
From the R/O Control tab, the Controls that are past schedule will read 'OVERDUE' in red. To see what this indicator looks like, refer to the Receiving Inspection Detail, R/O Control Tab.
Connect P/N to Existing History and Compliance Records:
When Inventory Switch CNCTPNHST is set to Yes, when a Part Number Serial Number is Accepted and saved in the Receiving Inspection window, a prompt appears asking if the user would like to connect this part to the existing history and compliance records for the same P/N S/N (if available). Users can also choose to not apply existing history records to the P/N S/N depending on their security clearance.
Security must be given to specific users in order to receive the message prompt in Receiving Inspection. The security options also allow administration to make the message prompt Yes/No optional or only informational. The securities can be found in the Security Explorer via Receiving/Update/Receiving Inspection/ PN / SN History Connection Yes Button Only and PN / SN History Connection Yes and No Button.
For detailed information refer to Switch CNCTPNHST via the Inventory Switches Manual.
Receiving In Use:
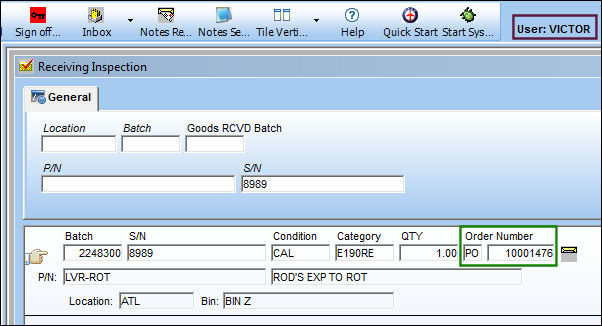
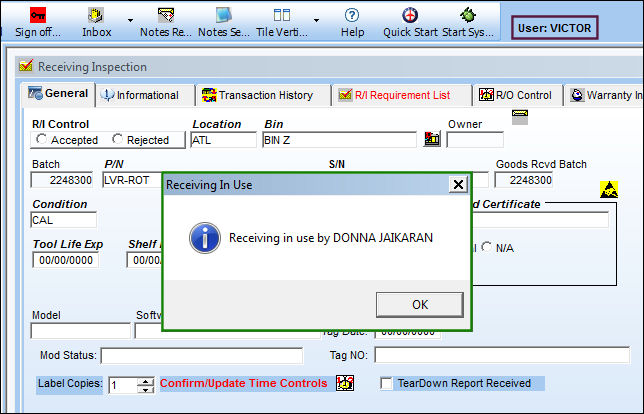
The system does not allow two users to be in the same Receiving Inspection at the same time.
Select into the following record:
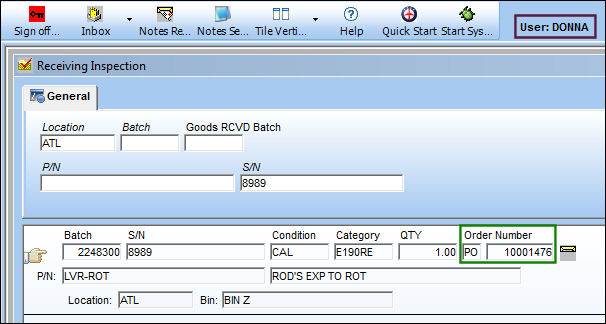
Select into the same record with a different User:
When User 'VICTOR' attempts to select into the same record, the following information box appears:
Share
Print
|
©1997-2026 Trax USA Corp. All rights reserved. This manual may not be copied, photocopied, reproduced, translated, or converted to any electronic or machine-readable form, in whole or in part, without prior written approval from Trax USA Corp. |
 |