
 Share
Share
 Print
Print
|
|
|
|
|


Upon being saved, at the bottom of the Engineering Task Card, the T/C Quick Reference Section allows users to conveniently view and update any Parts, Panels, Zones, and Effectivity linked to the Engineering Task Card. These reference guides are available from each tab in the Engineering Task Card Express window; they are also available when the Engineering Task Card is associated to a Work Order from the W/O Task Card window.
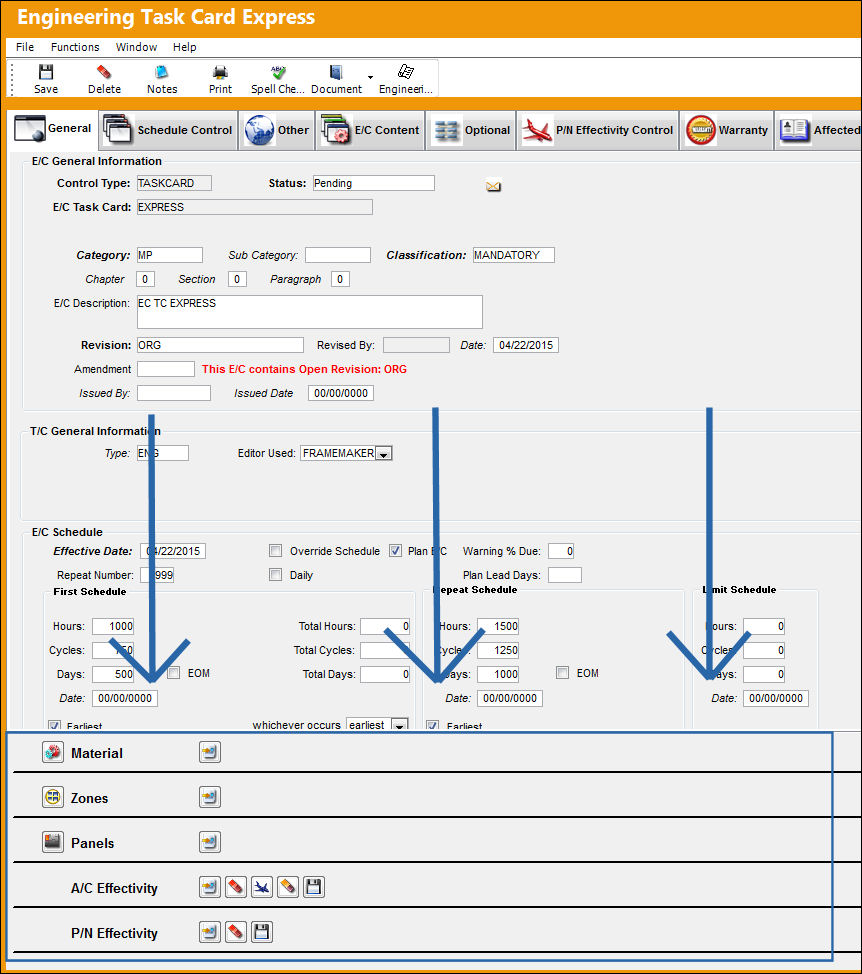
For detailed information on Task Cards and how/why they are linked to Work Orders, refer to the Task Card Button, via the Work Order Header Buttons.
The Material, Zones, and Panels options are available for all Task Card Editor types; the Items section is only available when T/C Editor NONE or TASKCARD are selected in the Optional tab. Only one of the Effectivity options can be utilized per E/C Task Card.
Materials:
Users can add or remove the parts required for the Task Card from the Materials section.

The following information/options are available in this window:
_____________________________________________________________________________________
Expand  / Collapse
  buttons
The Expand  button displays all of the information for the section. The Collapse
  button hides the same information.
Add/Delete Record  button
Select this button to add or remove parts that are associated to the Task Card. When selected, the Task Card P/N window pops up. The same fields in that window are also available in the Materials Section. From this window, however, users are able to set up System Notifications for the specific Task Card P/N by selecting the Notification  button.
New Record  button
Select this button to add a new line item to the section.
Delete Record  button
Delete the selected line item entry.
P/N
The Part Number reference for the aircraft part. This is the Part Number required for the T/C. A part number may be specified only one time per Item Number. However, the same part number may be specified on each unique item number if needed. Users can select into this field or select the Add/Delete Record button to add a P/N.
Description
The description of the part.
Item
The specific item number on the Task Card that this record is to be associated with. Leave default '0' to have this record associated with all item numbers on the Task Card.
Category
The category of the part as defined in Settings/ Explorer/ System Transaction Code Explorer/ Settings/ P/N Category (e.g. Rotable, Consumable, Repairable) and entered for the particular part in the P/N Master.
QTY
The quantity of items/parts required.
Spare/Tool drop down
Select Spare If the item required is a spare; this can be either an Expendable or a Rotable part. Select Tool if the item required is a tool; the P/N must be configured as a Tool in P/N Master via Settings/Update/P/N Master.
Reserve radio button
Select this option to reserve the spare or tool when W/O P/N reservation is applied. When a Picklist Reservation is made via a Work Order, only parts that have the Reserve radio button checked will be reserved. For more information regarding picklist creation, please go to Production/ Update/ Work Order/ Picklist button.
Repair Return radio button
Select this option to repair/return the spare when W/O P/N reservation is applied. This option is used if the currently installed part will be removed and repaired (via Shop or Repair Order) then reinstalled on the same aircraft to satisfy the Task Card's requirement. This is informational. When a Picklist Repair/Return is made via a Work Order, only parts that have the Repair/Return radio button checked will be repaired or returned.
None radio button
Select this option if no spare or tool will be reserved (picklisted) or repaired.
_____________________________________________________________________________________
For more information on the options available in this section, refer to the P/N Button from the Engineering - T/C Training Manual.
Zones:
Users can add or remove the specific work zones for the Task Card in the Zones section of the window.

The following information/options are available in this window:
_____________________________________________________________________________________
Expand / Collapse buttons
The Expand button displays all of the information for the section. The Collapse button hides the same information.
Add/Delete Record  button
Select this button to add or remove the Zones that are associated to the Task Card. When selected, the Task Card Zone window pops up. The same fields in that window are also available in the Zones Section.
New Record button
Select this button to add a new line item to the section.
Delete Record button
Delete the selected line item entry.
Zone
The Zone area for the Task Card (selected from Task Card Control Master).
Description
The Zone description for the Task Card.
Item
The specific item number on the Task Card that this record is to be associated with. Leave default '0' to have this record associated with all item numbers on the Task Card.
A/C Type/Series
The Aircraft Type and Series/Fleet assignment.
_____________________________________________________________________________________
For more information on the options available in this section, refer to the Zone Button via the Engineering - T/C Training Manual.
Panels:
Users can add or remove the specific panels that are required to be removed in order to carry out the T/C work in the Panels section of the window.

The following information/options are available in this window:
_____________________________________________________________________________________
Expand / Collapse buttons
The Expand button displays all of the information for the section. The Collapse button hides the same information.
Add/Delete Record  button
Select this button to add or remove the Panels that are associated to the Task Card. When selected, the Task Card Zone window pops up. The same fields in that window are also available in the Zones Section.
New Record button
Select this button to add a new line item to the section.
Delete Record button
Delete the selected line item entry.
Panel
The Panel reference to be removed for access.
Description
The Panel description information.
Item
The specific item number on the Task Card that this record is to be associated with. Leave default '0' to have this record associated with all item numbers on the Task Card.
A/C Type/Series
The Aircraft Type and Series/Fleet assignment.
_____________________________________________________________________________________
For more information on the options available in this section, refer to the Panel Button via the Engineering - T/C Training Manual.
A/C Effectivity:
For A/C E/Cs, users can add effectivity for particular aircraft by aircraft type/series, in addition to being overridden individually down to a specific A/C tail number in the A/C Effectivity section of the window.
The aircraft that appear in the window for a user's selection depends on how the security access is configured at the aircraft level in the Security Explorer.
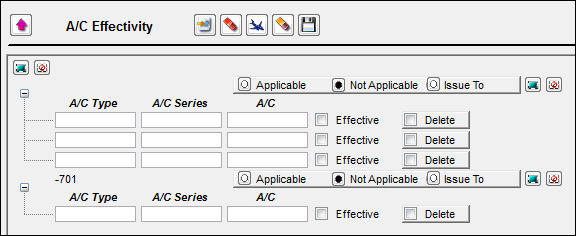
The following information/options are available in this window:
_____________________________________________________________________________________
Expand / Collapse buttons
The Expand button displays all of the information for the section. The Collapse button hides the same information.
New button
Select this button to add effectivity to a new specific A/C tail number.
Single Delete  button
Select this button to remove effectivity from the last A/C tail number added.
Load Type/Series  button
Select this button to open the Multi A/C Effectivity Selection window to add effectivity to entire A/C Type/Series through the Select All  button or the Deselect All
  button, or specific A/C tail number(s) from their checkbox via their Type/Series.
Multiple Delete  button
Select this button to remove effectivity for all A/C with the Delete checkbox selected.
Save  button
Select this button to save the Effectivity for the record.
Select All / Deselect All buttons
Select these buttons to select or deselect the Effective checkbox for all A/C that have been added/populated to the A/C Effectivity for the record.
A/C Type/Series
The Aircraft Type and Series/Fleet assignment.
A/C
The individual aircraft tail number.
Applicable radio button
Select this radio button if the record is applicable (effective) to the associated A/C of the specified Type/Series. This can also be selected through the Effective checkbox of the A/C. If a record is 'Applicable' to a particular A/C and has an existing compliance history, and is changed to 'Not Applicable,' the association between the existing compliance history and the effectivity will be broken. This will adversely affect the records: 'Completed No.' data, last Reset Date, compliance history, and Planning Query forecasting.
Not Applicable radio button
Select this radio button if the record is not applicable (not effective) to the associated A/C of the specified Type/Series. This can also be conducted through deselecting the Effective checkbox of the A/C.
Issue To radio button
Select this radio button if the record has been issued to this fleet type, but does not need to be put into effect. If the record is for the A/C Type/Series that the company operates, but is not effective to the current aircraft, possibly because only certain line numbers apply, then the Issue To radio button can be selected.
Select All / Deselect All buttons - Select these buttons to make all A/C of the particular Type/Series Applicable (Effective) or Not Applicable (Not Effective).
Effective checkbox
Select to make add effectivity to the A/C, which can also be conducted through the Applicable radio button.
Delete checkbox
Select this checkbox for the A/C or multiple A/C to be removed from the A/C Effectivity list for the record upon selecting the Multiple Delete button.
_____________________________________________________________________________________
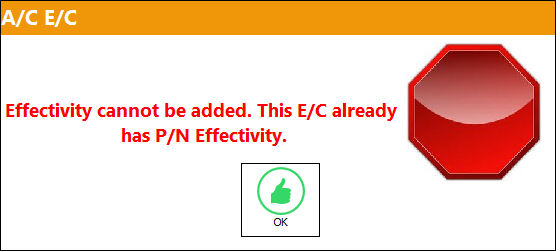
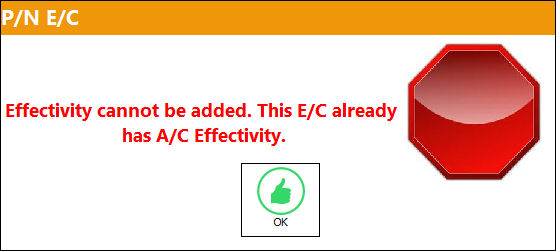
Attempting to add effectivity to A/C when the E/C and Task Card already has effectivity for P/N will prompt the following warning:
P/N Effectivity:
For P/N E/Cs, users can add effectivity for particular parts or components in the P/N Effectivity section of the window.
For the P/N E/C to be called via a P/N Control onto a work package, the P/N S/N must have effectivity at the P/N E/C level. For additional information, refer to the P/N Control Button, via the P/N Master of the Settings Training Manual.
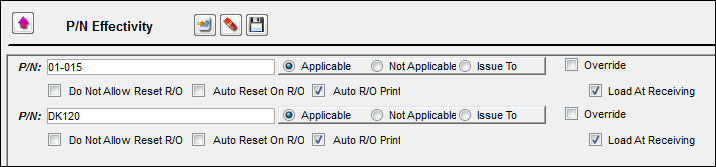
The following information/options are available in this window:
_____________________________________________________________________________________
Expand / Collapse buttons
The Expand button displays all of the information for the section. The Collapse button hides the same information.
New button
Select this button to add effectivity to a new P/N for the record.
Delete button
Select this button to remove effectivity from the last P/N added to the P/N Effectivity list for the record.
Save button
Select this button to save the Effectivity for the record.
P/N
The Part Number reference for the aircraft part. The part/component for the effectivity to be applied.
Applicable radio button
Select if this P/N is applicable to this particular record.
Not Applicable To radio button
Select if this P/N is not applicable to this particular record.
This can be used when a P/N was at one time applicable. Instead of deleting the P/N from the window, change the selection to Not Applicable. This will maintain history of the E/C and P/N.
Issue To radio button
Select if the record has been issued to this P/N, but does not need to be put into effect.
Override checkbox
Select this checkbox if this Part Number has been overridden in the past via the Override  button. Select the Override button to view specific P/N S/N history.
Do Not Allow Reset R/O checkbox
Select this checkbox to indicate that this record should not be reset (i.e. not selected for compliance) when associated with a Repair Order. When this Part Number is on a Repair Order, the default setting for this is that there will be no checkbox available in the control window to be selected or de-selected, it is not visible.
Auto Reset On R/O checkbox
Select this checkbox to indicate that this E/C should be reset (selected for compliance) when this E/C is associated with a Repair Order. This will be the default setting when this Part Number is on a Repair Order. This option can be overridden at the Repair Order level and de-selected.
All P/N E/Cs of Mandatory Classification will receive automatic E/C Compliance upon receipt of Vendor Repair Order.
Auto R/O Print checkbox
If this checkbox is selected, the E/C will automatically be printed on Repair Orders that are issued for the part indicated. This will be the default setting when this Part Number is on a Repair Order. This option can be overridden at the Repair Order level and deselected.
Load At Receiving checkbox
Select this checkbox if new Part Numbers (Inventory) initially entered into the system should have Effectivity linked to this E/C. Whenever a part linked to this P/N E/C is initially entered into the database (be it through P/O, L/O, P/N Initial Load, etc.), the Load at Receiving checkbox comes into effect. This checkbox applies to on-wing receiving as well. This checkbox can be auto selected for a specified E/C Category if the Load At Receiving checkbox is selected via the E/C Category Transaction Code.
This checkbox is strictly for the Purchase Order, Loan Order, and Engineering Control receiving and the P/N Initial Load feature. Repair Order for already existing Goods Received Batch Numbers (GRN) where the P/N was changed will apply the effectivity, but the E/C can be deselected as required.
_____________________________________________________________________________________
Attempting to add effectivity to P/Ns when the E/C and Task Card already has effectivity for A/C will prompt the following warning:
Items:
From the Items section, users can view, add, delete, and edit the itemized procedures that must be performed in order to complete the work for the Task Card. The information in this section is otherwise accessed through the Item  button, via the Task Card window. Through that window, additional buttons are available.
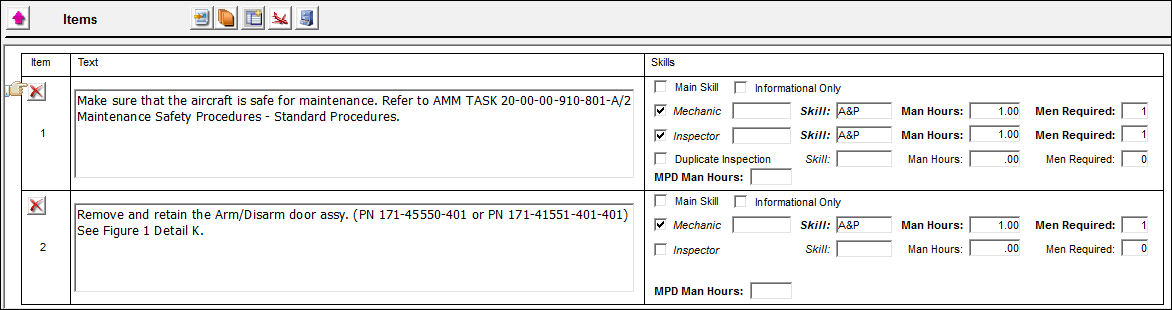
The Items section is only available when the T/C Editor in the Task Card, Optional 1 tab is set to 'TASKCARD' or 'NONE'.
The following information/options are available in this window:
_____________________________________________________________________________________
Expand / Collapse buttons
The Expand button displays all of the information for the section. The Collapse button hides the same information.
New Item button
Select this button to add a new line item to the section.
Delete Item button
Delete the selected line item entry.
Resequence  button
If the Item's Order number is changed, selecting this button will then change the sequence of the Items to reflect their updated Order number sequence.
Create Item From TraxDoc Reference  button
This button allows users to create/add TraxDoc Items to the Items window of a Task Card. For more information refer to the Create Item From TraxDoc Reference Button.
Item Effectivity  button
Select this button to set Effectivity for this specific Task Card Item by A/C Type/Series. For more information refer to the Effectivity Button.
TraxDoc Item References  button
This button allows users to reference the selected Item to a TraxDoc SGML. For more information refer to the TraxDoc Item Reference Button.
Item Number
The item number of the step required to accomplish the task.
Text
The details of the work that must be performed for the step.
Skills
This subsection is used to enter the required Inspector and Mechanic Skills, as well as the man hours and men required information for each skill. The following options are available.
Main Skill checkbox - Select this checkbox if this is the primary skill of the Task Card. The user can then organize the Task Cards by primary skill (using filter and sort functionality via the related modules such as Production Work Orders.)
Informational Only checkbox - Select if this item is for an informational step only (no labor required). When selected, the Main Skill checkbox will be removed from this window.
Mechanic checkbox - Select this option to enter any code number related to the mechanic (i.e. skill level). The code field only appears when the checkbox is checked.
Inspector checkbox - Select this option to enter any code number related to the inspector (i.e. skill level). The code field only appears when the checkbox is checked.
Skill - The Skill required for this item. Skills are set up via the Skill Master. For more information, refer to the Skill Master, General Tab via the Settings Manual. The Skills listed for Mechanic or Inspector (above) are validated against the Mechanic/Technician checkboxes associated to the specific Skill via the Skill Master, General tab.
Man Hours - The labor hours (per person) required for this Item.
Men Required - The number of personnel required for this Item.
Duplicate Inspection checkbox - Select this option if the Task Card requires a duplicate inspection.
MPD Man Hours - The MPD Man Hours X Task Mh Factor = Man Hours. For additional information, refer to Importing the MPD File, General Tab, via Manufacture Data Import of the Engineering - E/C Training Manual.
_____________________________________________________________________________________
For more information on this section, refer to the Task Card Item, General Tab and the Task Card Item, Skills Tab via the Engineering - T/C Training Manual.
Share
Print
|
©1997-2026 Trax USA Corp. All rights reserved. This manual may not be copied, photocopied, reproduced, translated, or converted to any electronic or machine-readable form, in whole or in part, without prior written approval from Trax USA Corp. |
 |