
 Share
Share
 Print
Print
|
|
|
|
|


The Display Control Area allows the user to manipulate the type of information being viewed in the Interactive Planner.
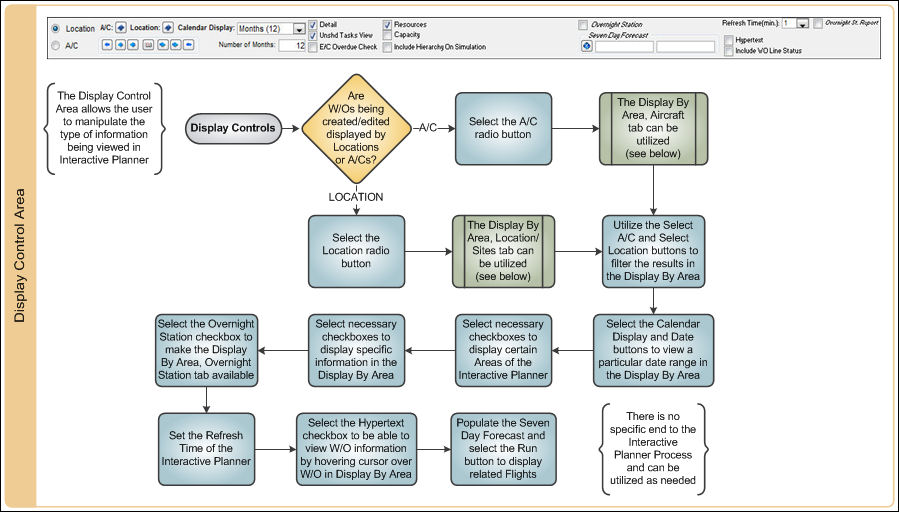

The following information/options are available in this window:
_____________________________________________________________________________________
Location Radio button
Select this radio button for a view of all locations where Planned Work Orders are coming due. This view will display each location and each site for that location as defined in the Location Master. For more information, please refer to the Site Button via Location Master in the Settings Training Manual.
A/C radio button
Select this radio button to view all Scheduled Flights. This view will display the Scheduled Flights as defined in the A/C Flight Schedule. For more information, please refer to the A/C Flight Schedule via the Technical Records Training Manual.
The Interactive planner will display scheduled flights up to a seven day forecast.
The flight information listed displays the Flight number and the Leg of the flight separated by a dash (ie: 012010-1). The origin and destination Locations are listed at the ends of the flight (ie: MIA - LAX). When the user points to the scheduled flight the below hypertext appears with the Flight, Flight Origin and Destination, Expected Time of Departure (ETD) and Expected Time of Arrival (ETA) information.
When the A/C radio button is selected, the Aircraft tab appears.
When the A/C radio button is selected, both the Display Schedule Flights and Display Planning Tasks checkboxes appear in the Display Control Area.
A/C  button
Select this button to view a list of all aircraft. Select or de-select all aircraft to be included in the view.
ETOPS (Extended-range Twin-engine Operational Performance Standards) aircraft are also identified.
Location button
Select this button to select the stations and maintenance locations/sites to be displayed in the planning view.
Date buttons
Select the Go To Date  button to view a current calendar to select a date to view Planning Jobs. Selecting the blue forward and backward buttons will move the displayed date range to the selected range of days. Days can be moved in intervals of days, months, or years.
Calendar Display
Select the Calendar Display drop down selection to view a list of time frames in which to view Planning Job(s). The options are Months (12), Month (1) in Weeks, Week (7), or Day.
Number of Months
Users can modify the number of days or months to be displayed.
When the below highlighted time frames are selected the Number of Months field changes to Number of Days.
Note: This value changes to days or month depending on the calendar display selection.
Display Planned Tasks checkbox
Select the Display Planned Tasks checkbox.
This allows the user to see when unscheduled tasks are coming due in relevance to existing Work Orders in the Display Control Area.
The following icons are displayed:
 - Defect Planning Task
 - E/C Planning Task
 - P/N E/C Planning Task
 - P/N Control Planning Task
When the user hovers over a maintenance event, a pop-up is displayed with the A/C, E/C, and E/C Description. Also, when the user selects a task in the Display Control Area, that task becomes selected (highlighted in blue) in the Planning Element Detail Area. The user may then select the Add Tasks  button to add one or more tasks to a selected Work Order. For more information, refer to the Planning Element Detail Area.
Overnight Station checkbox
Select this checkbox to filter for RON (Remaining Overnight) aircraft for a specific location.
For additional information, refer to Ron Process via Aircraft Type/Series which can be found in the Settings Training manual.
When the Overnight Station checkbox is selected, the following field and Reset Overnight Tab  button appears.
Enter a location and click on the Reset Overnight Tab button. The Overnight tab appears in the Display By Control Area.
RON aircraft for ATL appear in the Display By Area. A graphical display of the A/Cs will appear in the Display By Area.
Seven Day Forecast
Enter the Type/Series of an A/C and select the Run  button to view the Seven Day Forecast. For additional information, refer to Seven Day Forecast via Display Control Area which can be found in the Planning Training manual.
Reset Overnight Tab button
Once an Overnight Station has been selected, select the Reset Overnight Tab button to reset the information in the Display By Control Area and the Display By Area.
Detail checkbox
Select this checkbox to view the Selected Work Order Area.
Unshed Task View checkbox
Select this checkbox to view the Unscheduled Task Area.
E/C Overdue Check checkbox
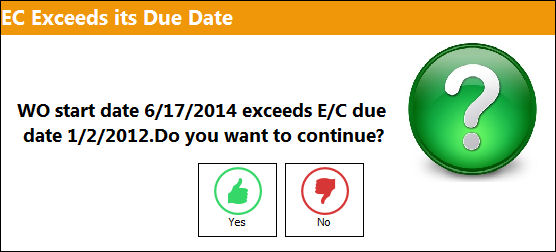
Select this checkbox for the system to check if the E/C will become overdue if the scheduled date has been moved forward. If the E/C is overdue, the following information pop-up will appear:
For more information, please see the Move Button via the Action Area.
Display Scheduled Flights checkbox
Select this checkbox to view Scheduled Flights. See Calendar radio button description within this table. This checkbox cannot be defaulted to remain de-selected, however if the Location radio button is selected, or if the Calendar Display is set to 12 months, flights will not be visible.
Display Planning Tasks
Select this checkbox to view Planning Tasks. See Calendar radio button description within this table.
Resources checkbox
When the Resources checkbox is selected, the Resources Area appears in the Interactive Planner. For additional information, refer to the Resource Area via the Interactive Planner View which can be found in the Planning Training manual.
Capacity checkbox
When the Capacity checkbox is selected, the Capacity Area appears in the Interactive Planner. For additional information, refer to the Capacity Area [E3] via the Interactive Planner View section which can be found in the Planning Training manual.
Only Locations with WO 
When the Only Locations with WO checkbox is selected, the Display by Control area and Display by Area will only display Locations with scheduled Work Orders. This selection will also filter for the Action Area and the Capacity Area.
The Location radio button must be selected to view this checkbox.
Display Man Hours checkbox
When selected, the average amount of required daily Man Hours for each Work Order in a Location/Site are listed under the Work Order. Man Hours for each W/O are determined by the amount of hours registered in the W/O Task Card Items. For this option to be available, Planning Switch  INTERACTPLANMANHOURS must be set to Yes. For detailed information refer to the Planning Switches Manual.
If the 'Exclude Man Hours from Interactive Planner' checkbox is selected in the W/O, Optional tab, then that specific W/O's Man Hours will not be displayed in the Interactive Planner.
Include Hierarchy On Simulation checkbox
Select this checkbox to include a hierarchy on the run simulation. If one Skill is not available for the Work, the system will look for the next available Skill. This hierarchy must be set up via the Skill Master. For additional information regarding the set up of the Skill Hierarchy, refer to the Hierarchy Button via Skill Master which can be found in the Settings Training manual. For information regarding how this checkbox works with the Run Simulation, refer to the Include Hierarchy On Simulation via Run Simulation Button which can be found in the Planning Training manual.
Panel Resize  button
If any section of the Interactive Planner has been manually resized, select this button to reset the window sections back to the original size.
Refresh Time (min)
This window does not automatically refresh. The user may use the drop down menu to select the value (number of minutes) to determine the refresh rate of data displaying in the window.
Hypertext checkbox 
Select this checkbox to include W/O number, W/O description, A/C registration number, A/C S/N, W/O start and completion dates (if applicable). This information will appear when the user hovers over the desired W/O node.
Include WO Line Status checkbox
Select this checkbox to include Work Orders with a Line status. The window will automatically refresh to display the change.
_____________________________________________________________________________________
A/C Radio Button:
When the A/C radio button is selected, the view of the Display Control Area displays a color for each aircraft status:
Color |
Aircraft Status |
Red |
Out of Service |
Yellow |
Pending |
Green |
In Service |


 Share
Print
Share
Print
|
©1997-2026 Trax USA Corp. All rights reserved. This manual may not be copied, photocopied, reproduced, translated, or converted to any electronic or machine-readable form, in whole or in part, without prior written approval from Trax USA Corp. |
 |