
 Share
Share
 Print
Print
|
|
|
|
|


P/N N/L/A Creation
The P/N N/L/A Creation option allows users to create or modify P/N assemblies and sub-assemblies. This window is primarily utilized when building the assembly during the process of bringing the component(s) into the system.
Users can modify P/N Controls, view related notes, and delete parts from the assembly as necessary.
Enter a valid N/H/A Part Number Serial Number and select the Find  button.
The search result displays as follows.
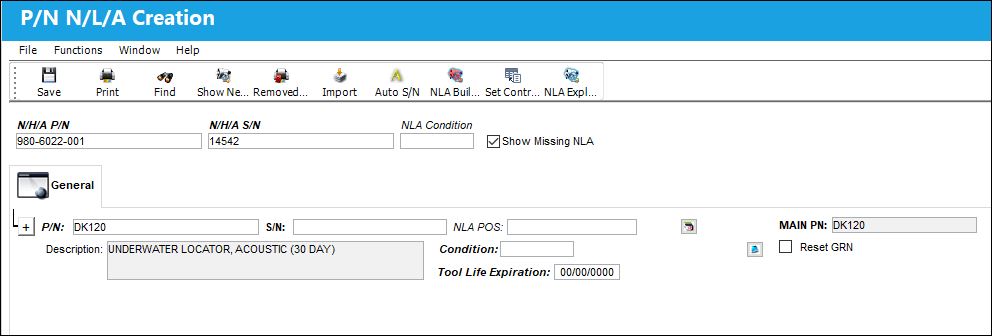
The following fields should be reviewed for the assembly's sub components (NLAs). The fields should be populated for any NLAs that are missing this data. (Select the Edit  button to modify the fields for any NLA.)
_____________________________________________________________________________________
N/H/A P/N
The part’s Next Higher Assembly P/N (if applicable). This is the main assembly part being updated.
N/H/A S/N
Next Higher Assembly (NHA) serial number.
NLA Condition
The condition of the N/L/A being received. Once the condition has been populated, it will cascade down to all of the N/L/A components.
Show Missing NLA checkbox 
When this checkbox is selected, it allows the user to view all installed and missing N/L/As on an assembly. This checkbox is selected by default upon opening the P/N N/L/A Creation window.
P/N
The Part Number reference for the aircraft part. The Next Lower Assembly component that is being updated. Multiple P/Ns will be listed as NLAs for the assembly.
S/N
The Serial Number for the specific serialized part. The Serial Number of the Next Lower Assembly components.
N/L/A Position
The position of the Next Lower Assembly. This position indicates where the NLA is to be installed in the assembly.
MAIN P/N
The NLA's Main P/N in the Part Number Master. This field is only necessary if the NLA component is an interchangeable with a main component.
Reset GRN checkbox 
Select the Reset GRN checkbox to override the previous goods received number (Goods Received Batch) and have the system automatically create a new GRN for this part after the transaction is completed. This is useful if an assembly is sent for repair and is returned with a new lower component. If the Reset GRN checkbox is checked, a new GRN is created. This will have the system create a new history for the assembly and not associate the new lower component with the history of the prior assembly.
Condition
The current Condition of the Next Lower Assembly component.
Shelf Life Expiration
Updates the shelf life expiration date of the part. For more information refer to the Override  button below.
_____________________________________________________________________________________
 Note: There is an audit table in Trax Quick Print called 'pn_sn_change_control_audit' that shows the before and after of the data that is updated via a P/N Change transactions. This information pertains to serialized parts. The data captured includes:
- Previous E/Cs linked to P/N S/N & Actuals
- Previous P/N Controls and Actuals
- New E/Cs being linked
- New P/N Controls being linked
- Transfer of Actuals
Upon entry/update of the above information, select the Save  button. The following buttons can be used to further specify the assembly's NLA data.
_____________________________________________________________________________________
P/N Control  button
Select this button to update the P/N Inventory Controls.
Once this button has been selected, and any changes have been made and saved, the button will change from blue to red.
Notes  button
Select this button to view a note(s) added to the NLA as part of receiving.
The user may not add or edit a note. The note is view only.
Delete  button
Select the Delete button to delete the selected N/L/A Serial Number from the assembly then enter a new Serial Number in its place. The new P/N S/N does not have to currently exist in inventory. A history record will be written for the new part.
The deleted P/N S/N will be removed from inventory.
The following prompt will appear. The user will be asked to confirm your request.
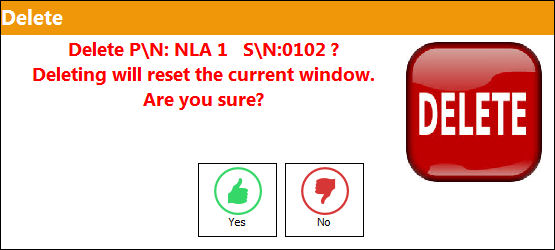
Select Yes. The user will be required to enter a new Serial Number for the specific deleted N/L/A. The P/N Assembly Explorer will indicate that the Serial Number (part) is missing from the assembly until a new Serial Number is input and saved.
P/N E/C  button
Opens the P/N E/C selection window where users can create or edit E/Cs for the selected part. For more information refer to the P/N E/C Button via the Receiving Training Manual.
 The Select checkbox, Complied checkbox, Revision field, Status field, and Reset Date field each are security controlled via Receiving/ Update/ Receiving Inspection/ P/N E/C Selection. For more information refer to the Security Explorer via the System Administration Training Manual.
P/N Initial Times Accrual  button
When this button is selected, the following window will appear:
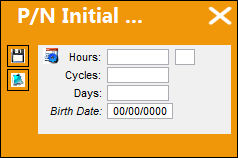
Populate the Hours/Cycles/Days fields and select the Save button. For additional information regarding this button, refer to the P/N Initial Times Accrual button, via the Inventory Training manual.
Edit button
Select this button to edit the NLA position and NLA condition. Upon selecting the edit button, the P/N, S/N, NLA Position and Condition fields will be cleared out and available for update.
Override button
When selected, the Shelf Life Days in the P/N Master, Inventory tab is Overridden by 365 days of the entered date. For more information on Shelf Life, refer to P/N Master, Inventory Tab via the Settings Training Manual.
Replace Batch  button
Select this button to replace an existing PN S/N Batch with the new P/N S/N that was added to the assembly via a Repair Following transaction. This button is part of the Repair Following functionality (optional in the Repair Order process) and is only available when a Repair Following transaction took place during the repair. For more information refer to the Repair Following Button via the Orders Training Manual.
_____________________________________________________________________________________
Select the N/L/A  button to view the P/N Assembly Explorer (graphical format) which contains direct access to the P/N Detail Print. For additional information please see the NLA Explorer button section of the Technical Records Training Manual.
Select the Show Next Higher Part Number  button to view detailed information regarding the N/H/A part number. For additional information please see the Show Higher Part Number button section of the Technical Records Training Manual.
Assembly Not Complete:
When the user attempts to create or modify a part number assembly and exit the P/N N/L/A Creation window without creating the NLA(s), the user will receive a soft warning.
Select the Exit button without creating the NLAs:
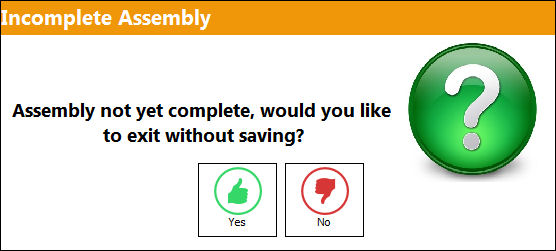
TRAX displays the following soft warning:
If the user selects Yes, the user will be able to create the NHA as an incomplete assembly. If they select No, they will be taken back to the P/N N/L/A Creation window to create the NLAs.
The following buttons are available for the window as a whole to offer additional functionality:
- Print Button
- Show Next Higher Part Number Button
- Removed Part Tag Print Button
- Import Button
- Auto S/N Button
- NLA Build From History Button
- Set Control To All Button
- NLA Explorer Button
Share
Print
|
©1997-2026 Trax USA Corp. All rights reserved. This manual may not be copied, photocopied, reproduced, translated, or converted to any electronic or machine-readable form, in whole or in part, without prior written approval from Trax USA Corp. |
 |