Publication Date: 8/17/2026 Share Print

Previous Topic

Next Topic

Book Contents

Book Index

Part Number Creation Process

Creating Part Numbers is a very detailed task the requires the input from various departments such as Inventory, Finance, Engineering and Reliability. Before a Part Number can be created in the system, the Part Number Categories must be defined via the P/N Category Transaction Code. Once these Categories have been defined, individuals can begin the Part Number Creation process. Aside from the P/N Category Transaction Code, the individual Part Number Configuration takes place in the P/N Master of the Settings module. The P/N Master is used to create, configure and store all inventory parts that will be used within the system for an airline, MRO or both. Once these parts have been created in the P/N Master, transactions can be performed for these parts throughout the entire system.

The Part Number Creation process is designed to allow users to visualize the entire procedure for creating a Part Number.
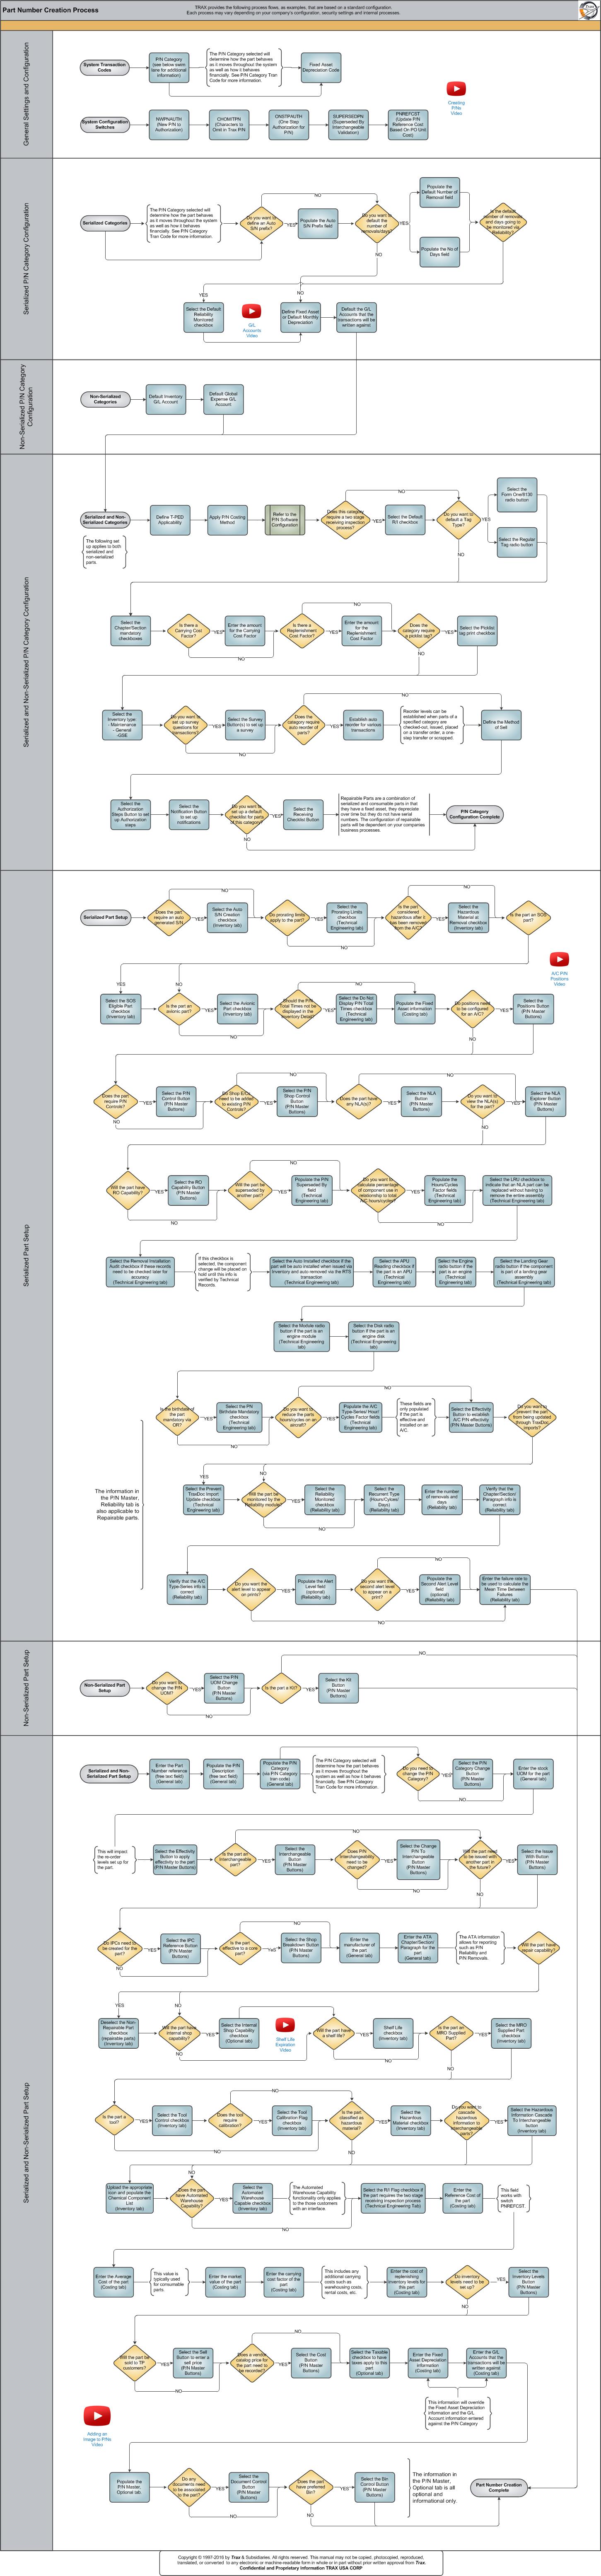
Click on the steps to see details!

System Transaction CodesP/N CategoryFixed Asset Depreciation CodeSystem Configuration SwitchesNWPNAUTHCHOMITPNONSTPAUTHSUPERSEDPNPNREFCSTSerialized P/N Category ConfigurationPopulate the Auto S/N Prefix fieldPopulate the Default Number of Removal fieldPopulate the No of Days fieldSelect the Default Reliability Monitored checkboxDefine Fixed Asset or Default Monthly DepreciationDefault the G/L Accounts that the transactions will be written againstDefault Inventory G/L AccountDefault Global Expense G/L AccountDefine T-PED ApplicabilityApply P/N Costing MethodSelect the Default R/I checkboxSelect the Form One/8130 radio buttonSelect the Regular Tag radio buttonSelect the Chapter/Section mandatory checkboxesEnter the amount for the Carrying Cost FactorEnter the amount for the Replenishment Cost FactorSelect the Picklist tag print checkboxSelect the Inventory typeSelect the Survey Button(s) to set up a surveyDefine the Method of SellSelect the Authorization Steps Button to set up Authorization stepsSelect the Notification Button to set up notificationsSelect the Receiving Checklist ButtonPopulate the P/N Master DescriptionPopulate the P/N Category Select the P/N Category Change ButtonEnter the stock UOM for the partEnter the Part Number referenceEffectivity Button [11]Select the Interchangeable ButtonSelect the Change P/N To Interchangeable ButtonSelect the Issue With ButtonSelect the IPC Reference ButtonSelect the Shop Breakdown ButtonEnter the manufacturer of the partEnter the ATA Chapter/Section/Paragraph for the partDeselect the Non-Repairable Part checkboxShelf Life checkboxSelect the MRO Supplied Part checkboxSelect the MRO Supplied Part checkboxSelect the Tool Control checkboxSelect the Tool Calibration Flag checkboxSelect the Hazarous Material checkboxSelect the Hazarous Information Cascade To Interchangeable buttonUpload the appropriate icon and populate the Chemical Component ListSelect the Automated Warehouse Capable checkboxSelect the Inventory Levels ButtonSelect the Sell Button to enter a sell priceSelect the Cost ButtonEnter the Reference Cost of the partEnter the Average Cost of the partEnter the market value of the partEnter the carrying cost factor of the partEnter the cost of replenishing inventory levels for this partEnter the G/L Accounts that the transactions will be written againstEnter the Fixed Asset Depreciation informationSelect the Taxable checkboxSelect the Bin Control ButtonSelect the Document Control ButtonPopulate the P/N Master, Optional TabNon-Serialized CategoriesSerialized and Non-Serialized CategoriesSerialized and Non-Serialized Part SetupSelect the Internal Shop Capability checkboSelect the R/I Flag checkboxSerialized Part SetupSelect the Auto S/N Creation checkboxSelect the Prorating Limits checkboxSelect the Hazardous Material at Removal checkboxSelect the SOS Eligible Part checkboxSelect the Avionic Part checkboxSelect the Do Not Display P/N Total Times checkboxPopulate the Fixed Asset informationSelect the Positions ButtonSelect the P/N Control ButtonSelect the P/N Shop Control ButtonSelect the NLA ButtonSelect the NLA Explorer ButtonSelect the RO Capability ButtonPopulate the P/N Superseded By fieldPopulate the Hours/Cycles Factor fieldsSelect the LRU checkboxSelect the Removal Installation Audit checkboxSelect the Auto Installed checkboxSelect the APU Reading checkboxSelect the Engine Radio buttonSelect the Landing Gear radio buttonSelect the Module radio buttonSelect the Disk radio buttonSelect the PN Birthdate Mandatory checkboxPopulate the A/C Type-Series/Hour/Cycles FactorSelect the Effectivity ButtonSelect the Prevent TraxDoc Import Update checkboxSelect the Reliability Monitored checkboxSelect the Recurrent Type (Hours/Cycles/Days)Enter the number of removals and daysVerify that the Chapter/Section/Paragraph info is correctVerify that the A/C Type-Series info is correctPopulate the Alert Level fieldPopulate the Second Alert Level fieldEnter the failure rate to be used to calculate the Mean Time Between FailuresNon-Serialized Part SetupSelect the P/N UOM Change ButtonSelect the Kit ButtonEstablish the auto reorder for various transactionsAdding an Image to P/Ns VideoShelf Life Expiration VideoA/C P/N Positions VideoCreating P/Ns VideoG/L Accounts VideoP/N Software Configuration

Each step in the process chart is explained in further detail throughout the following documentation. The procedural sections are broken down into the following categories:

See Also

PROCESS FLOWS

Aircraft Actual Flight (Manual Entry) Process

Aircraft Initial P/N Load Process

Aircraft Return and Archiving Process

Aircraft Units Process

APU Process

Assembly Management

Concession Registry Process

Consigned Inventory Process

Contract Order Process

Customer Creation Process

Defect Report Process

Delete E/C and P/N Control Compliance Process

Dent Mapping Process

Employee and Skill Creation Process

Engineering Control Process

Engineering Pending Release Process

ETOPS Process

Exchange Order Out Process

Exchange Order Process

Fault Code Report Process

Flight Accumulation Process

Ground Service Equipment (GSE) Process

Helicopter Process

Importing a File Process

Interactive Planner Overview

Internal Component Repair (Shop) Process

Kit Management

Library and Read & Sign Process

Loan Order Process

Location Creation Process

Man Hours Schedule Planning Process

Managed A/C Process

MEL Process

MEL Authorization Process

Missing Parts Process

Monthly Financial Procedures

New Aircraft Process

Order Invoice Process

P/N Control - General Configuration

P/N Control - Life Limited Parts (LLP)

P/N Control - Proration Process

P/N Initial Load Process

P/N Pool Agreement Process

P/N Remove/Install Process

P/N Software Configuration

Packing and Shipping Process

Physical Inventory Process

Picklist and Requisition Process

Printer Setup and Configuration

Purchase Order Process

Quality Assurance Process

R/O Capability Employee Rating Process

Receiving Process

Recurrent Item Alert (Reliability) Process

Rental Order Process

Re-Order Level Process

Repair Order Process

Repair Order Following Process

Return to Stock Process

Return To Vendor Process

Sales Order Process

Scrap Process

Security Explorer Process

Service Order and Power By The Hour Process

Skill Master Process

Standard Authorization Process

Supply Chain Process

System Notification Creation Process

Task Card Creation Process

Task Card Discrepancy Process

Third Party Work Order Process

Tool Management

Training Process

Transfer Order Process

TRAX General Process Flow

TraxDoc Process

Vendor Contract Process

Vendor Creation Process

W/O Task Card Assignment and Workshop Process

Warehouse Management

Warranty Management

Work Order Process

Work Order Reservation Control Process

Work Turnover Process

Top of Page Publication Date: 8/17/2026 Share Print